Does my system run as well as it should?
- Does darktable use the hardware acceleration of my GPU or does it only run on the CPU?
- Does a wrong setting slow down my hardware?
- I want to buy a higher-resolution camera – is my system enough?
- I use Linux – which OpenCL drivers should I use?
My system is ok, but how can I work more fluidly in darktable?
Performance analysis helps you understand what is happening “under the hood.” Here we explain the most important concepts.
In the following post we use terms such as CPU, (i)GPU or (V)RAM. In our Small Hardware Glossary you will find the explanations (in connection with darktable).
Export speed via darktable-cli
With the DT-PA Performance Analyser tool, you can measure the export speed on your system.
A high-performance export is a good indicator of the overall performance of the system and establishes the relationship to the speed of interactive processing in the darkroom.
Steps to perform the analysis
- Download the RAW & XMP zip files for either:
- Unzip them in a directory where you will run the analysis.
- Create/Copy a command prompt with our Command Builder so your computer system can run the necessary analysis on either a 24MP or 61MP image.
- Run the command in a terminal:
- Navigate to the directory where the images were unzipped.
- Run the command prompt.
- Be patient until the command prompt either completes successfully, or returns an error message.
- The process creates a log file in the same directory the images are in.
- Go to the DT-PA Performance Analyzer, and upload your log file(s).
- This will provide you with an analysis on how your system works with darktable.
- If you would like to compare your results with other system configurations, go to the corresponding benchmark page and use the “Add Log Files” button:
After reading in the file, the browser jumps directly to your added data. The entry will only be preserved until you leave the page. We also do not store any logs on the server.

- Your system is as fast as others, but it still feels slow? Then just continue to the next section.
- Your system is much slower? We will explain you below possible causes and how to solve them.
Interactive processing in the darkroom
Depending on the hardware used, the processing in the darkroom is up to 10x faster.
If you want to know the exact value, you can use our tool DT-RM Realtime Monitor (instructions). It shows you the exact time for each editing step – in real time.
The working speed and export time are highly dependent on the modules used. While basic corrections (e.g. Exposure) almost always run without delay, computationally intensive modules (such as Diffuse or Sharpen, Chromatic Aberrations or Denoise (profiled)) can lead to noticeable response times even on powerful hardware.
Causes of slow processing
The Pixelpipe: An assembly line for data
You can imagine the processing in Darktable like an assembly line. The image is passed from module to module (e.g. Demosaicing -> Exposure -> White Balance -> Tone Mapping (e.g. AgX)).
The goal is to load the image once on the graphics card (GPU), work off all the steps there and export the finished image. Not all modules can be run efficiently on the GPU, but use the CPU instead.
CPU-Only (no OpenCL)
Modern image editing algorithms perform millions of calculations per pixel.
- A CPU has few, very complex cores (e.g. 16 cores).
- A GPU has thousands of simple cores (e.g. 4000 shader units).
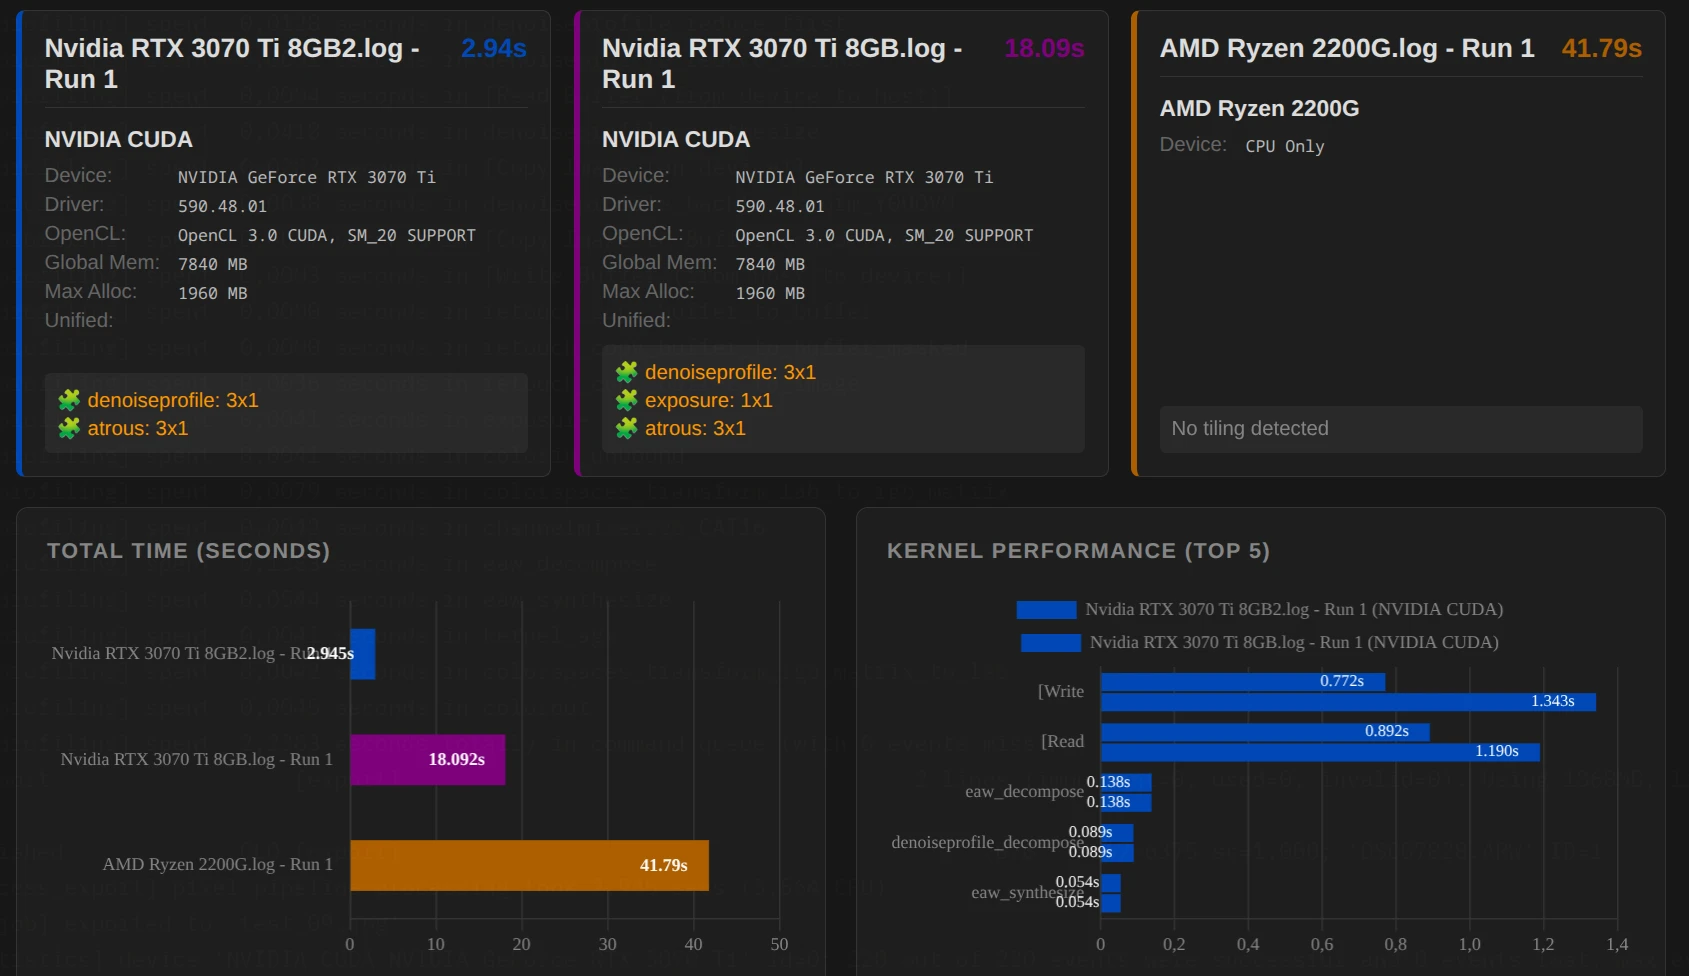
For image editing, in which each pixel can be edited in parallel, the GPU is usually superior to the CPU. The following example shows the difference: An export that lasts on the GPU 3 s may require 40 s on the CPU.
The “ping-pong” effect (CPU vs. GPU)
A common bottleneck for performance is not necessarily a too slow GPU, but the transport of data between GPU and CPU and the calculation on the CPU.
- Ideal case: Image -> GPU -> Module A -> Module B -> Module C -> Output.
- Problem case: Image -> GPU -> Module A -> CPU Module B (data must be returned to RAM) CPU calculates -> Back to GPU -> Module C (“ping-pong”).
A single module that does not run on the GPU (or is disabled on the OpenCL) can slow down the entire pipeline.
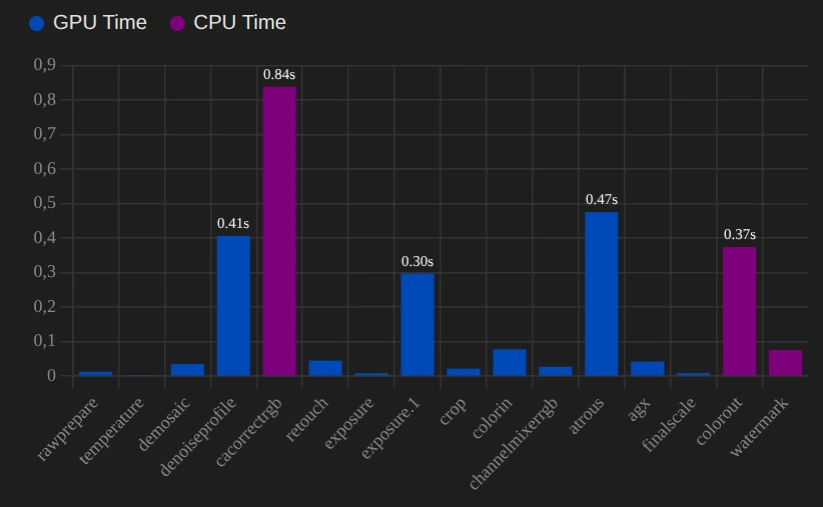
The figure on the right shows another example of the differences in processing time between GPU and CPU.
When does this problem occur?
- The module has no OpenCL support: the editing is therefore done on the CPU.
- The GPU has too little memory (VRAM) for one module:
Not every module can use tiling (next section). If the memory of the GPU is not enough, there is only the detour via the CPU.
Tiling
Graphics cards have very fast but limited memory (VRAM). A 24-megapixel image often occupies several gigabytes in the VRAM during processing.
- What’s happening? If the image does not fit in one piece in the VRAM of the GPU, Darktable breaks it down into tiles.
- The disadvantage: Each tile must be calculated individually. So that you do not see any edges, (mostly) the tiles have to overlap (“ghosting”). These overlapping ranges are thus calculated twice.
- The result: Tiling allows the export of large images on small graphics cards, but often costs performance. Nevertheless, processing via the CPU is (significantly) slower.
The driver interfaces: Who is talking to the hardware?
Darktable uses OpenCL (or Nvidia CUDA) to talk to the graphics card. But how OpenCL is implemented makes a difference.
Example: AMD RX 9060 XT with 8 GB (gfx1200) – OpenCL-Mesa (RustiCl) vs. ROCm
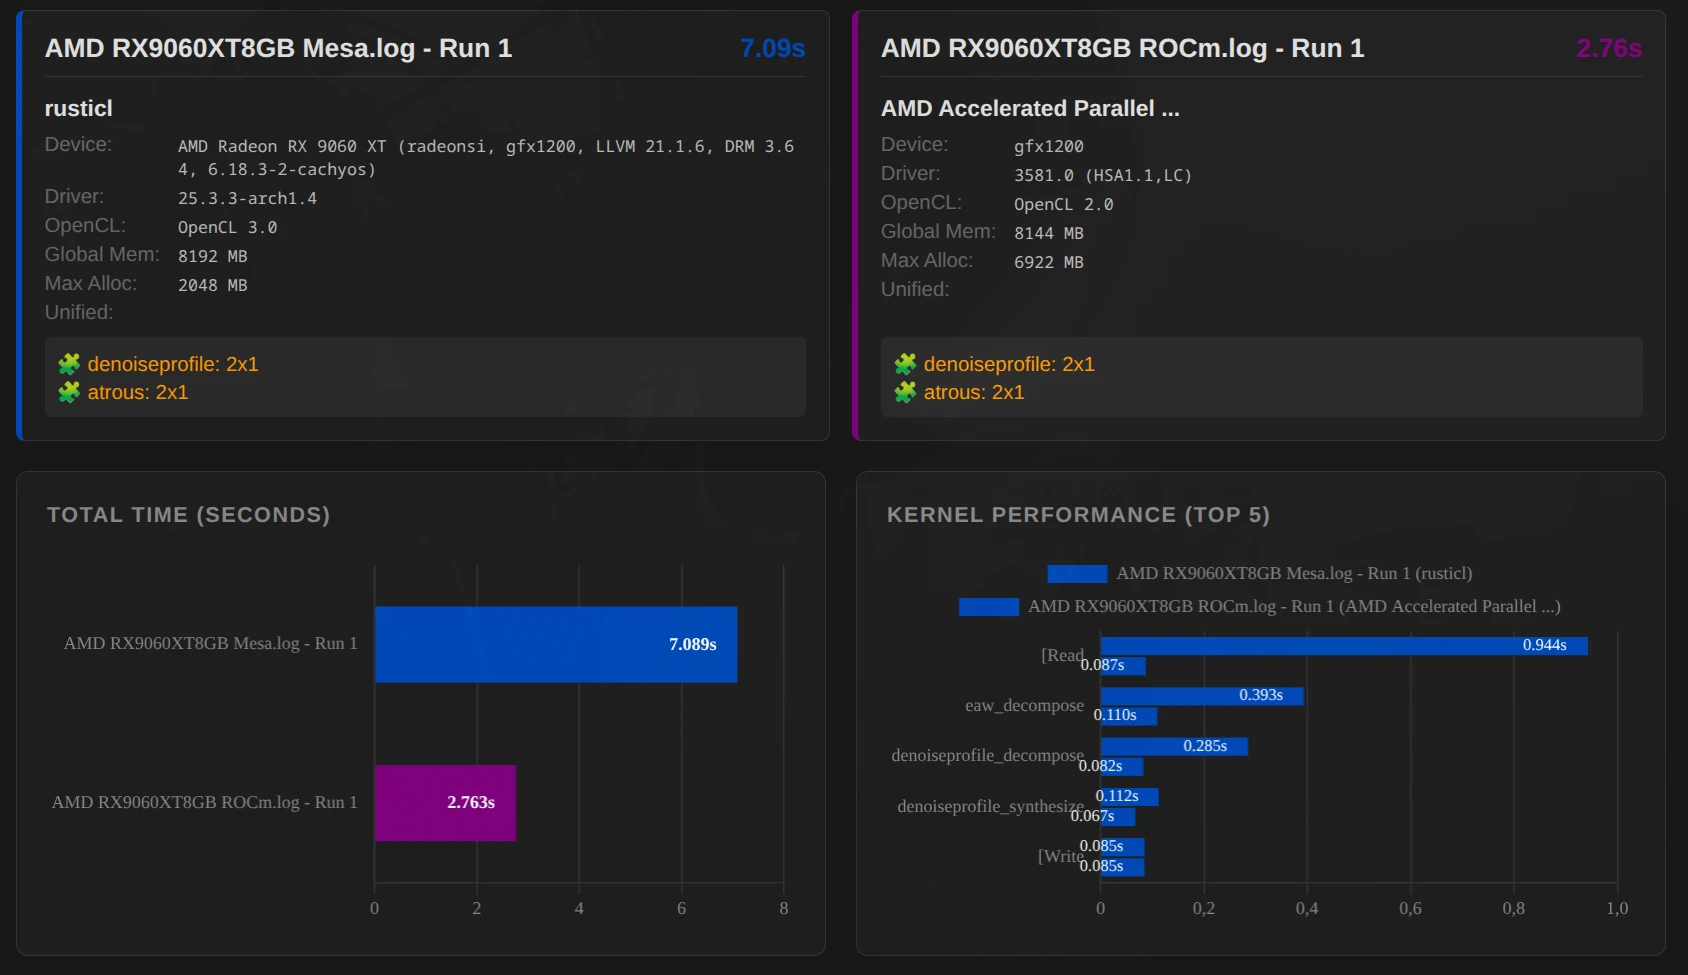
Important: The example does not provide a statement as to whether ROCm is generally faster than OpenCL-Mesa (RustiCl)! Depending on the system, it can be different.
- Example AMD 7945HX 64 GB + RX 9060 XT 8 GB – ROCm faster
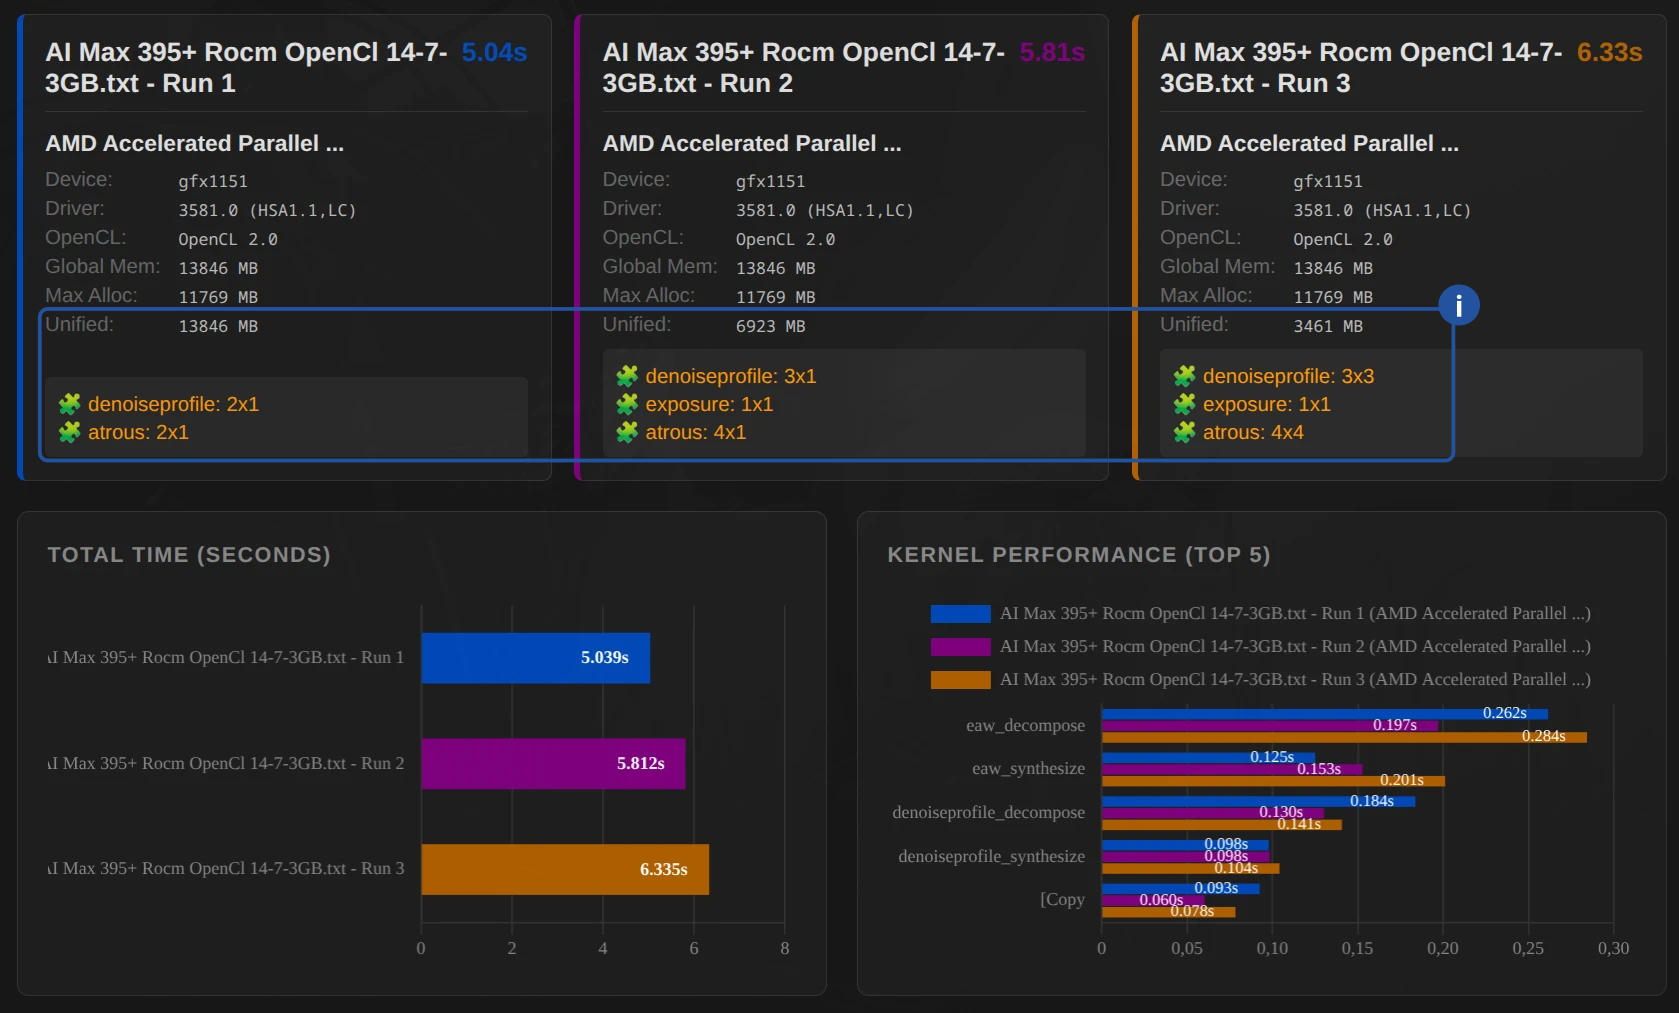
- Example AMD AI 395 Max+ – RustiCl faster
ROCm (Radeon Open Compute)
This is AMD’s modern approach to high-performance computing on Linux.
- Advantage: Often very fast and stable with newer cards (RX 6000/7000/9000 series). Uses the hardware very efficiently.
- Disadvantage: Officially supported only for certain distributions and cards, sometimes tricky during installation.
RustiCl (OpenCL-Mesa)
A newer OpenCL driver written in the Rust language, which is part of the Mesa project.
- Advantage: Often works “Out of the Box” on many Linux systems and also supports older hardware or integrated graphics units (iGPUs) that are no longer maintained by the proprietary drivers.
- Performance: Meanwhile, often on par with the proprietary drivers, sometimes even faster on specific tasks and hardware.
Proprietary Drivers (AMD Pro / Nvidia)
- Nvidia: There are hardly any alternatives here. The proprietary driver is extremely mature and high-performance.
- AMD Pro: Mostly solid, but on Linux it is increasingly displaced by ROCm or RustiCl.
And how does that help me now?
The analysis serves as a diagnostic tool: If DT stops or the export takes too long, you can immediately see which component (CPU, GPU or RAM) is the bottleneck. This allows you to specifically start where your hardware is limited or a graphics driver is missing (CPU only).
Actionable options in darktable
While working in darktable:
- Activate OpenCL
- Temporarily disable modules: Switch compute-intensive modules that are not decisive for the look at the moment (e.g. Diffuse or Sharpen, Denoise (profiled), Chromatic Aberrations), only at the very end of the editing or leave them out altogether. This keeps the preview smooth.
Important: The order of the modules in the pixel pipe of DT is fixed. Even if you turn on a module “later”, it is calculated at the technically correct location – so it is worth leaving the “heavy chunks” deactivated until the end. - OpenCL Driver (Linux/AMD): Test whether your AMD card is running better with the ROCm driver or the newer RustiCl stack. A simple A/B test of the export time quickly brings clarity.
With the DT-RM Realtime Monitor you have all important information at a glance for every single step – in real time.
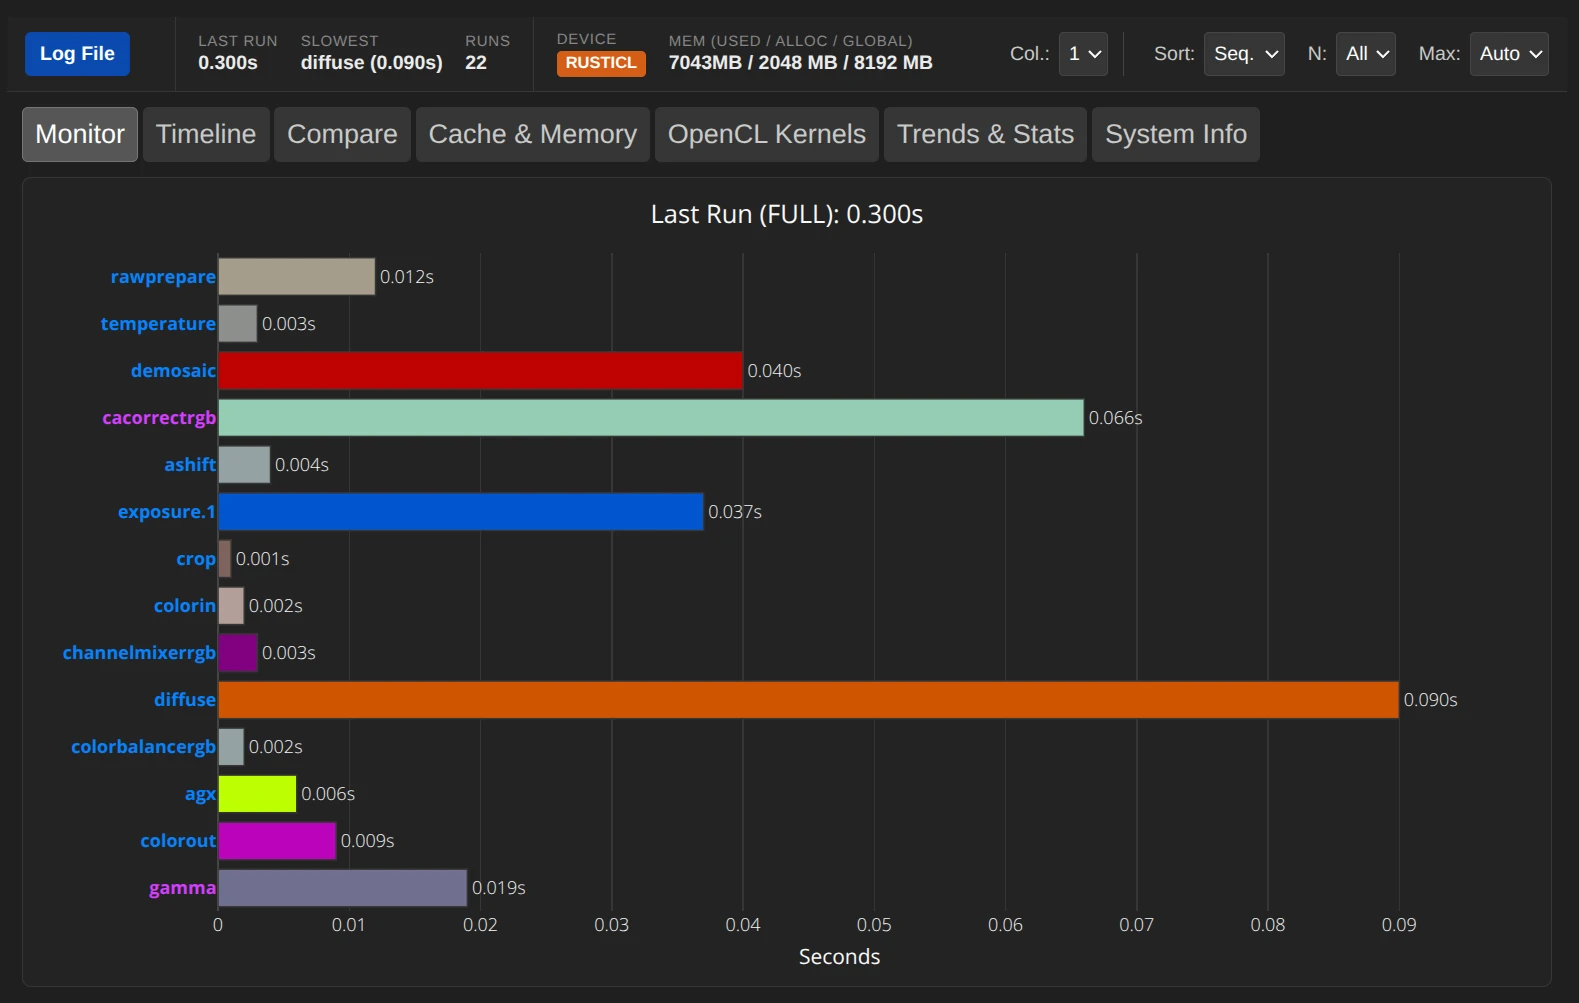
- Device: Shows you if and what type of OpenCL is being used (e.g. RustiCL, ROCm, Cuda, …).
- The names of the modules are color-coded: Blue = GPU, Purple = CPU
In this example, one could temporarily disable cacorrectrgb and diffuse.
Hardware settings – iGPU
iGPU Memory Management: If you do not use a dedicated graphics card, assign more system RAM to the iGPU in the BIOS. While 4 GB is enough for simple edits, 8 GB or 16 GB is significantly faster with high-resolution sensors and complex modules.
February 12, 2026