User Guide
This tool allows you to batch-process RAW images using the darktable-cli command via a simple web interface. It is useful for benchmarking or debugging, as it captures and displays detailed logs.
Copy the code into your text editor and save the file e.g. as dt-logs.py
Python
import datetime
import os
import subprocess
import streamlit as st

# --- PATH CONFIGURATION ---
IMAGE_DIR = "/mnt/67ef4d2e-2cc3-43bf-b41a-d9c56e06cf83/05_Software/darktable/Darktable.info/Benchmark/"
OUTPUT_DIR = "/mnt/67ef4d2e-2cc3-43bf-b41a-d9c56e06cf83/05_Software/darktable/Darktable.info/Benchmark/"
DARKTABLE_CLI = "darktable-cli"

# --- COLOR CONFIGURATION (CSS) ---
COLOR_PRIMARY = "#007BFF"
COLOR_BUTTON_TEXT = "#FFFFFF"
COLOR_BG_SECONDARY = "#262730"

RAW_EXTENSIONS = (".ARW", ".CR2", ".CR3", ".NEF", ".DNG", ".ORF", ".RAF", ".PEF", ".RW2", ".SRW", ".X3F", ".GPR")

os.makedirs(OUTPUT_DIR, exist_ok=True)

st.set_page_config(page_title="DT Bench", layout="wide", initial_sidebar_state="expanded")

# --- CSS INJECTION ---
st.markdown(f"""
<style>
    div.stButton > button:first-child {{
        background-color: {COLOR_PRIMARY} !important;
        color: {COLOR_BUTTON_TEXT} !important;
        border-color: {COLOR_PRIMARY} !important;
        width: 100%;
    }}
    div.stButton > button:first-child:hover {{
        background-color: {COLOR_PRIMARY}99 !important;
        border-color: {COLOR_BUTTON_TEXT} !important;
    }}
    /* Kompakterer Header */
    .block-container {{ padding-top: 2rem; }}
</style>
""", unsafe_allow_html=True)

# --- SIDEBAR: CONFIGURATION ---
with st.sidebar:
    st.header("⚙️ Einstellungen")

    default_prefix = f"bench_{datetime.datetime.now().strftime('%Y%m%d_%H%M')}"
    log_prefix = st.text_input("Log Prefix", value=default_prefix)

    col_run, col_cpu = st.columns([1, 1])
    with col_run:
        num_runs = st.number_input("Runs", min_value=1, value=1, step=1)
    with col_cpu:
        st.write("") # Spacer
        st.write("")
        force_cpu = st.checkbox("CPU Only", value=False)

    # Flags kompakt in einem Expander
    with st.expander("CLI Flags", expanded=True):
        c1, c2 = st.columns(2)
        with c1:
            use_opencl = st.checkbox("-d opencl", value=True)
            use_perf = st.checkbox("-d perf", value=True)
        with c2:
            use_tiling = st.checkbox("-d tiling", value=True)
            use_pipe = st.checkbox("-d pipe", value=True)

    # Logging kompakt
    with st.expander("Logging", expanded=False):
        save_individual_logs = st.checkbox("Save per Image (.txt)", value=True)
        save_master_log = st.checkbox("Save Master Log", value=False)

# --- MAIN AREA ---
st.title("Darktable Benchmark Runner")

# 1. File Listing
try:
    all_files = os.listdir(IMAGE_DIR)
    raw_files = [f for f in all_files if f.upper().endswith(RAW_EXTENSIONS)]
    raw_files.sort()
except FileNotFoundError:
    st.error(f"Folder not found: {IMAGE_DIR}")
    raw_files = []

if not raw_files:
    st.warning("No RAW files found.")
else:
    # Helper: Select All Container
    col_sel1, col_sel2 = st.columns([0.85, 0.15])
    with col_sel2:
        # Kleiner Hack für "Select All": Checkbox steuert Session State
        if st.checkbox("Select All"):
            default_selection = raw_files
        else:
            default_selection = []

    with col_sel1:
        selected_files = st.multiselect(
            f"Bilder auswählen ({len(raw_files)} verfügbar):",
            raw_files,
            default=default_selection
        )

    st.write("") # Kleiner Abstand

    # Start Button (Full Width via CSS)
    if st.button("🚀 Start Processing", type="primary"):
        if not selected_files:
            st.warning("Bitte mindestens ein Bild auswählen.")
        else:
            # --- PROCESSING LOGIC (Identisch geblieben) ---
            progress_bar = st.progress(0)
            status_text = st.empty()

            with st.expander("Live Logs ansehen", expanded=True):
                log_area = st.empty()

            display_log_buffer = f"--- START: {datetime.datetime.now()} ---\n"
            if force_cpu: display_log_buffer += "MODE: CPU ONLY\n"
            master_log_buffer = display_log_buffer
            total_files = len(selected_files)

            for i, filename in enumerate(selected_files):
                input_path = os.path.join(IMAGE_DIR, filename)
                xmp_path = input_path + ".xmp"
                output_filename = os.path.splitext(filename)[0] + "_test.jpg"
                output_path = os.path.join(OUTPUT_DIR, output_filename)

                file_specific_log = f"=== BENCH: {filename} ===\n"
                file_specific_log += f"Date: {datetime.datetime.now()} | Runs: {num_runs}\n\n"

                for run_i in range(num_runs):
                    current_run_num = run_i + 1
                    status_text.text(f"Processing ({i + 1}/{total_files}): {filename} | Run {current_run_num}")

                    cmd = [DARKTABLE_CLI, input_path, xmp_path, output_path, "--core"]
                    if force_cpu: cmd.append("--disable-opencl")
                    if use_opencl: cmd.extend(["-d", "opencl"])
                    if use_tiling: cmd.extend(["-d", "tiling"])
                    if use_perf: cmd.extend(["-d", "perf"])
                    if use_pipe: cmd.extend(["-d", "pipe"])

                    try:
                        result = subprocess.run(cmd, capture_output=True, text=True, check=False)

                        run_log = f"--- RUN {current_run_num} ---\n"
                        run_log += f"CMD: {' '.join(cmd)}\n"
                        run_log += result.stdout + "\n" + result.stderr + "\n"
                        run_log += f"--- END RUN {current_run_num} (Exit: {result.returncode}) ---\n\n"

                        file_specific_log += run_log
                        display_log_buffer += f"\n[{filename} | R:{current_run_num}]\n" + run_log

                        # Log update nur alle paar Zeilen um UI nicht zu blockieren bei riesigen Logs
                        log_area.code(display_log_buffer[-2000:], language="bash") # Zeige nur die letzten 2000 Zeichen live

                    except Exception as e:
                        st.error(f"Error: {e}")

                # Save Individual Log
                if save_individual_logs:
                    safe_log_name = f"{log_prefix}_{filename}.txt"
                    try:
                        with open(os.path.join(OUTPUT_DIR, safe_log_name), "w", encoding="utf-8") as f:
                            f.write(file_specific_log)
                    except Exception as e: st.error(e)

                if save_master_log:
                    master_log_buffer += file_specific_log + "\n"

                progress_bar.progress((i + 1) / total_files)

            # Save Master Log
            if save_master_log:
                try:
                    with open(os.path.join(OUTPUT_DIR, f"{log_prefix}_MASTER.txt"), "w", encoding="utf-8") as f:
                        f.write(master_log_buffer)
                    st.success(f"Master log saved.")
                except Exception as e: st.error(e)

status_text.success("Fertig!")1. Prerequisites
- Python 3.8+ installed.
- Darktable installed (specifically
darktable-cli). - Images: A folder containing RAW files (e.g.,
.ARW,.CR3) and their corresponding.xmpsidecar files.
2. Installation
Open your terminal and install the required library:
Fish
pip install streamlit 3. Configuration
Open the script (DT-Logs.py) in a text editor and adjust the Configuration Section at the top:
IMAGE_DIR: The full path to the folder containing your RAW files.OUTPUT_DIR: The full path where the results (JPGs) and Logs should be saved.DARKTABLE_CLI: Path to the executable (usually just"darktable-cli"if it is in your system PATH).
4. How to Run
Run the application from your terminal:
Fish
streamlit run DT-Logs.pyA browser window will open automatically (usually at http://localhost:8501).
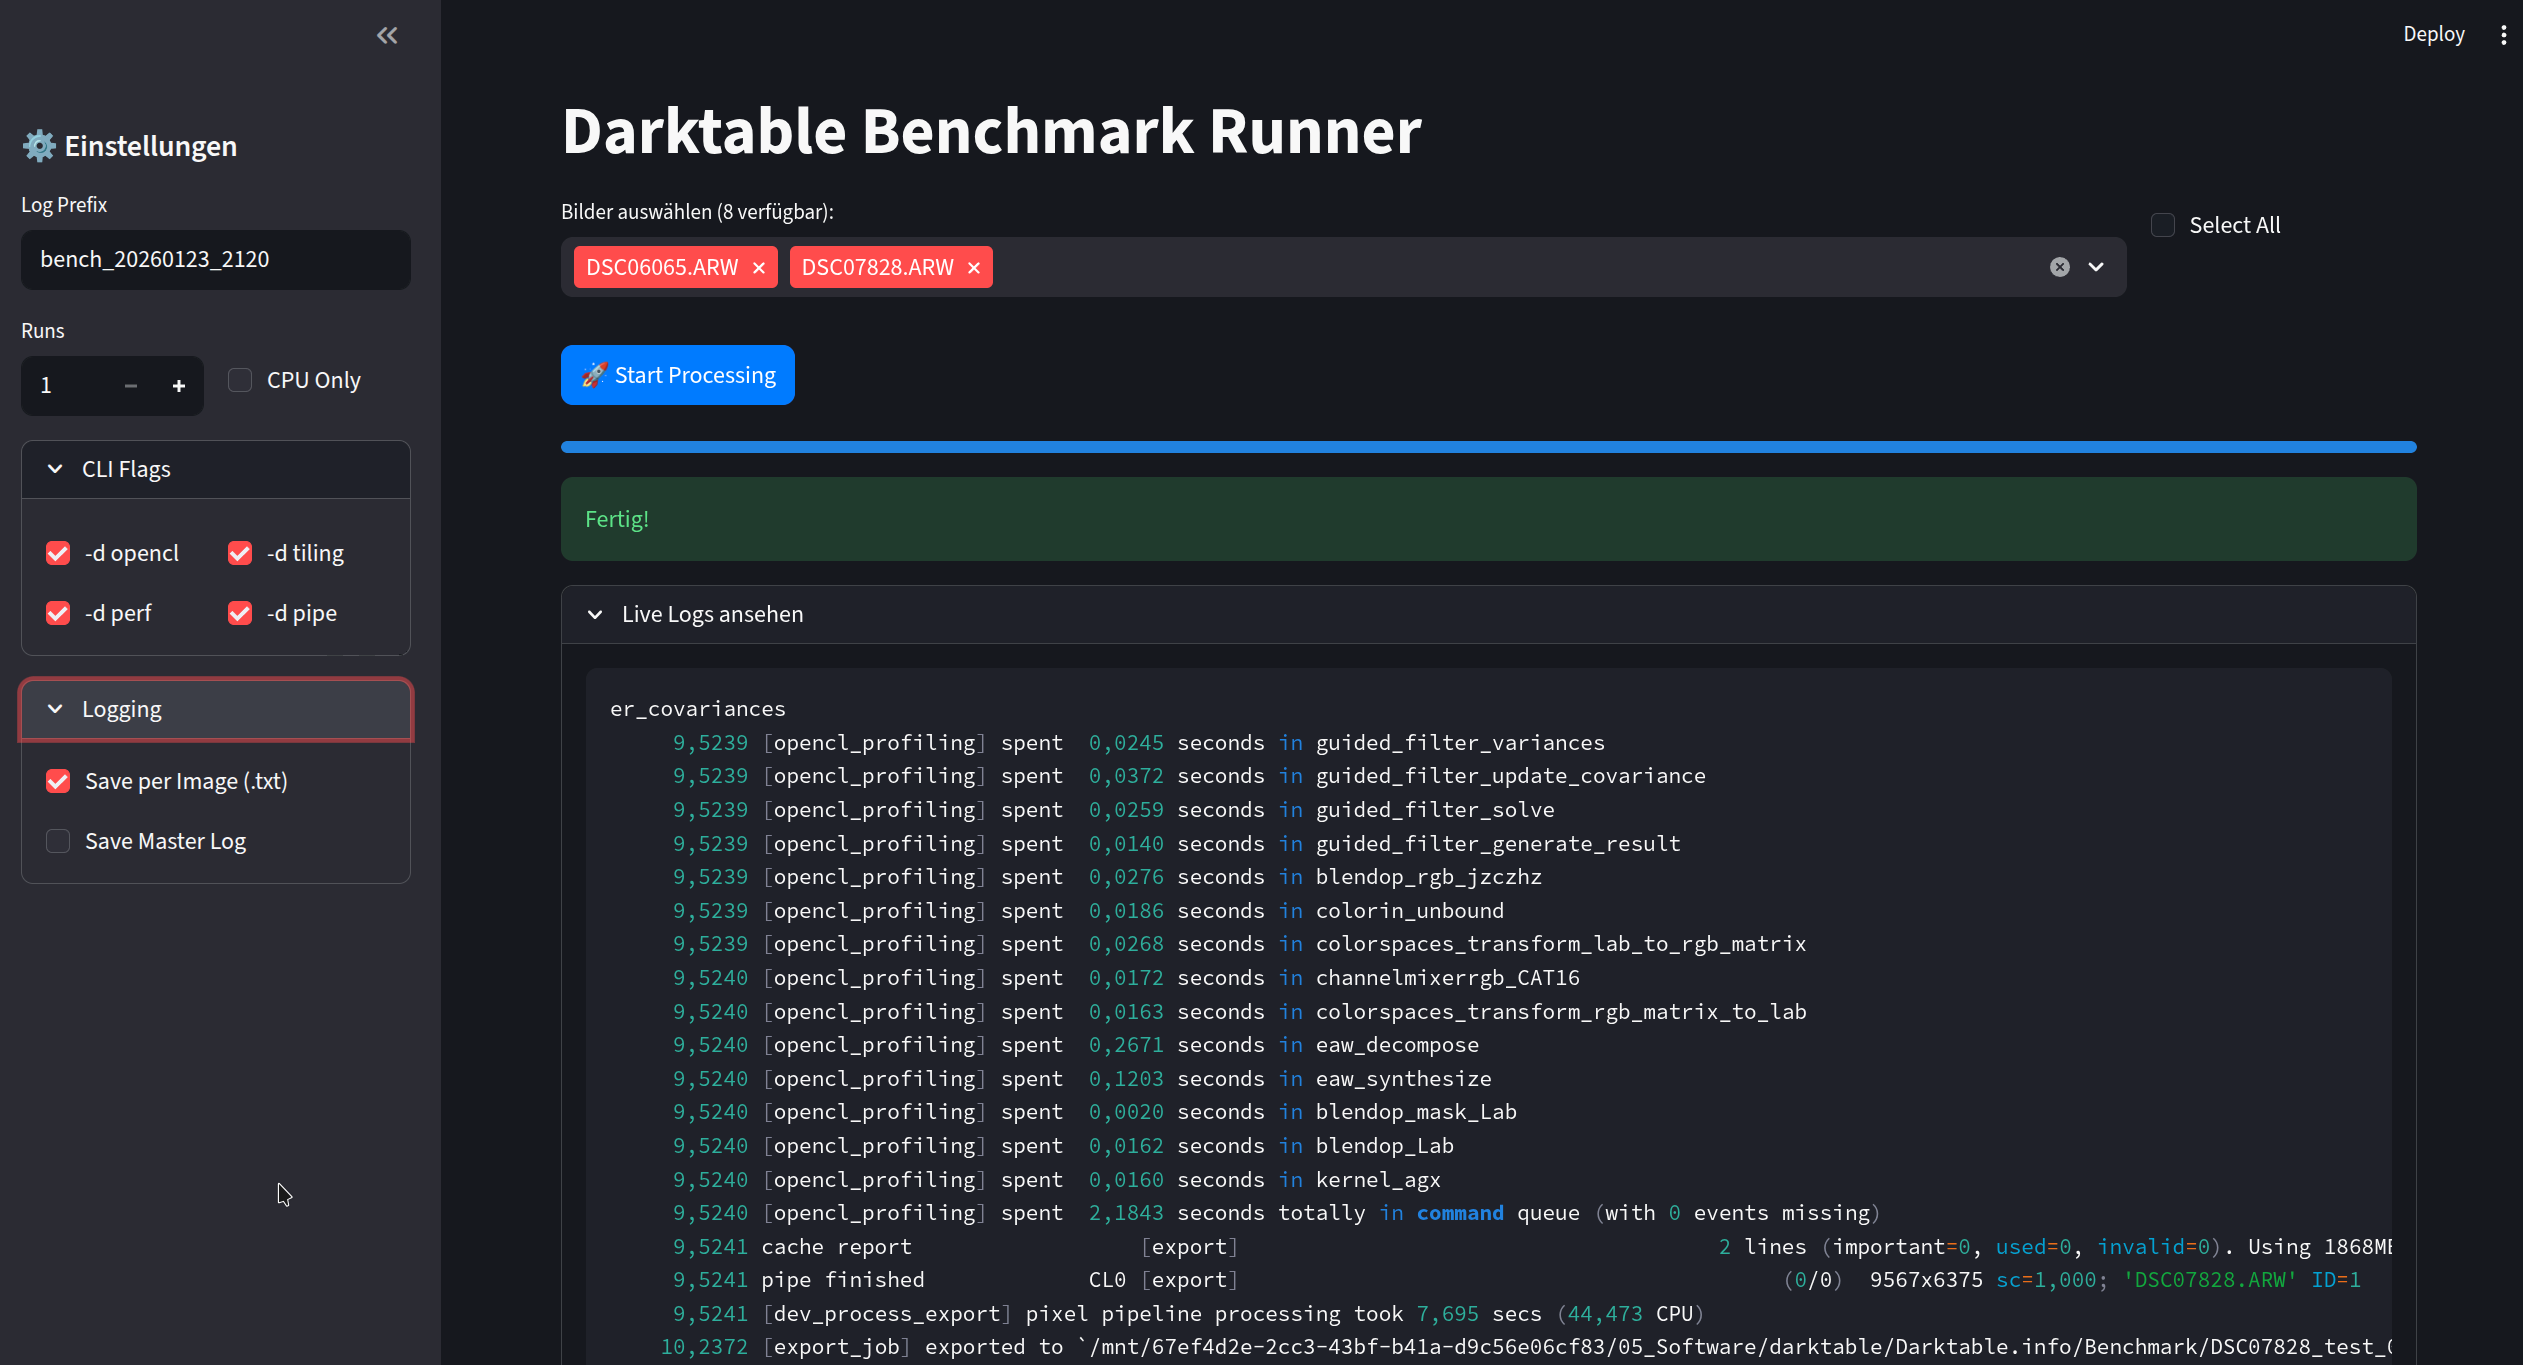
5. Usage
Configuration (Sidebar)
- Log Prefix: Enter a custom prefix for your log files (a timestamped default is provided).
- Runs: Set how many times each photo should be processed (useful for averaging benchmark results).
- CPU Only: Check this to force processing without OpenCL (
--disable-opencl). - CLI Flags: Expand this section to toggle specific Darktable debug modes (e.g.,
-d opencl,-d perf). - Logging: Choose whether to save individual log files per image and/or a combined master log.
Select Images
- In the main window, choose one or multiple images from the list.
- Use the “Select All” checkbox to quickly select every available RAW file.
Start Processing
- Click the “🚀 Start Processing” button.
January 23, 2026