The Contrast Equalizer is the specialist for details. It is your tool for sharpness, clarity, and noise reduction.
Unlike a simple slider, this module allows you to control contrast separately for different detail sizes. So you can sharpen fine pores without making coarse shadows harsher – or vice versa.
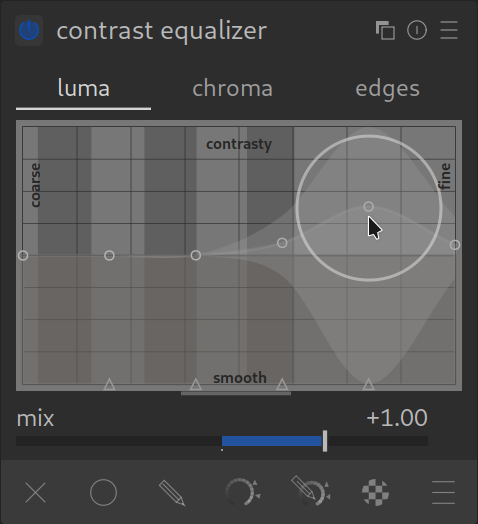
Understanding the Curve
The heart is the curve. The X-axis (bottom) sorts details by their size:
- Far left (Coarse): Large structures, clouds, face shapes.
- Effect: If you raise the curve here, you increase the local contrast (similar to “Clarity” in other programs). The image looks more three-dimensional.
- Middle: Medium details.
- Right (Fine): Fine structures, eyelashes, leaf veins.
- Effect: Raising here provides sharpness.
- Far right (Micro): Pixel noise.
- Caution: If you raise here, you only amplify image noise!
Application: Sharpening Correctly
To make an image crisp without destroying it:
- Go to the “Luma” tab (Brightness). This is the most important tab.
- Pull the curve up in the right area (Fine).
- Leave the curve far right (Noise) down or even pull it slightly below the zero line.
- Result: You sharpen the details but smooth the noise.
Application: Softening (Skin Retouching)
You can also pull the curve down.
- Pull the curve slightly down in the “Fine” area to soften skin blemishes without making the whole image look blurry.
The Other Tabs
- Chroma (Color): Works like Luma, but for color saturation.
- Tip: Pull the curve far right (Noise) down. This is an excellent denoiser for color noise!
- Edges: A special mode that tries to detect edges. For the beginning, you can usually ignore this, “Luma” is almost always enough.
Summary
- Use the Luma tab.
- Curve up (right): Sharpen details.
- Curve down (far right): Suppress noise.
- Curve up (left): More “punch” and clarity in the image.
Pro Tip: Sharpening without Noise (Denoise-Threshold)

A common problem with sharpening: You amplify not only the details but also the image noise. The Contrast Equalizer has a brilliant solution built in for this.
How it works:
When you pull the curve for Luminance or Edges up to sharpen, you see a second, flat line at the bottom of the graph (often barely visible).
- Sharpening: Pull the upper curve in the “fine” area (right) up. The image becomes sharper, but maybe also grainier.
- Protect Noise: Now pull the points on the bottom edge of the graph slightly up (see screenshot).
- With this, you define a Threshold.
- Everything that lies in contrast below this curve (i.e., the very fine, quiet noise) is not sharpened.
- Everything that lies above (real edges and structures) is sharpened.
The Result: You get crisp details without the flat background suddenly starting to noise.
EXAMPLE: See our Contrast Equalizer Example page with before and after images, as well a zip file to download the original example image and XMP sidecar file of how the example edits were made.
For more information, view darktable’s official manual page: “contrast equalizer”.
Questions about this topic? Discuss it with us in the forum!
March 1, 2026