For flawless images.
What is it about?
Even the best photo sometimes has small flaws: A dust speck on the sensor, a blemish in a portrait, or a distracting soda can in the grass of a landscape shot. The Retouch module is your digital eraser. It is significantly more powerful than the old “Spot Removal” tool, as it handles complex shapes and frequency separation.

How to apply it:
- Choose an algorithm:
- Heal: Copies structure and color from the surroundings and intelligently blends them with the target area. This is usually the best choice for skin blemishes.
- Clone: Copies an image area exactly to another location.
- Fill: Fills an area with a color or blur.
- Blur: (Often useful to soften skin without losing structure).
- Choose a shape (circle, ellipse, path, or brush).
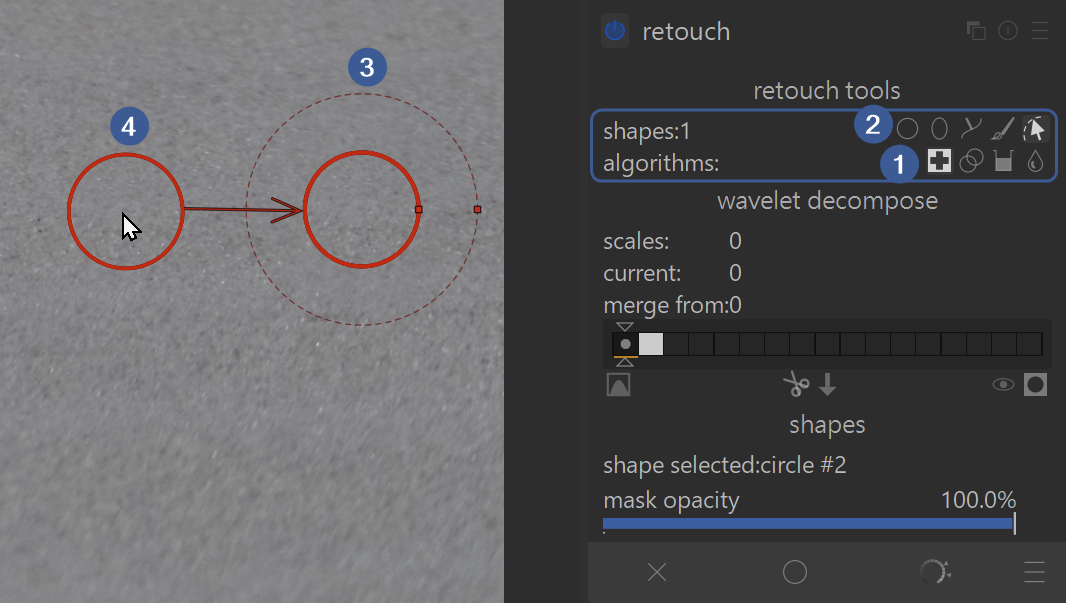
- Click on the spot you want to correct (target).
- Darktable automatically selects a source to copy from; you can move this source until the you achieve the desired result.
Controls & Pro Tips:
Here is how you can massively speed up your workflow:
- Mouse Wheel Controls:
- Mouse wheel: Changes the size of the tool.
- Shift + Mouse wheel: Changes the hardness of the edge (feather size / softness).
- Ctrl + Mouse wheel: Changes the opacity – ideal for making retouches look more natural.
- Fast Working (Click-Drag):
Instead of clicking first and then searching for the source, you can Click & Drag:- Click on the spot you want to remove
- hold the mouse button down
- drag the mouse pointer to the area you want to heal or duplicate from
- release button (the start point is retouched with the end point)
- Remove Multiple Spots (Ctrl-Click):
If you Ctrl + Click on a shape icon (e.g., the circle), you stay in this mode. You can then click away many spots one after another without having to reselect the tool each time.
For advanced skin retouching, the module offers an integrated wavelet decomposition. This allows you to remove skin blemishes without destroying the pore structure of the skin (“frequency separation”). (See the darktable manual for more information on wavelet decompose.
EXAMPLE: See our Retouch Examples example page with before and after images, as well a zip file to download the original example image and XMP sidecar file of how the example edits were made.
For more information, view darktable’s official manual page: “retouch”.
Questions about this topic? Discuss it with us in the forum!
January 30, 2026