The Exposure module is the first and most important step in your editing. Here you lay the foundation for everything else.
In the modern darktable workflow (scene-referred), this module has a very specific task: It defines the brightness of your midtones or main subject.
It is not there to rescue blown-out highlights or brighten deep black shadows – later modules like AgX (a tone mapper), Tone Equalizer or Color Balance RGB take care of that.
The most important sliders
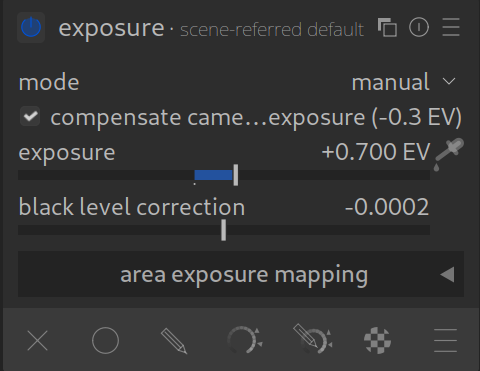
1. Exposure
This is the main slider. It works in Exposure Values (EV).
- +1 EV means the image becomes twice as bright (like one stop more on the camera).
- -1 EV means the image becomes half as bright.
How to use it correctly:
Look at your main subject (e.g., a person’s face). Move the slider so that this subject looks correctly exposed. Ignore whether the sky in the background might become too bright or blown out, or the blacks crushed. We will take care of that later in tone mapping (AgX).
2. Black level correction
This slider defines when a pixel is considered “pitch black”.
- Recommendation: Keep your hands off it! Darktable automatically reads this value from your camera’s RAW data. Manual changes often lead to washed-out colors or color casts in the shadows. Only change this if you know exactly that the automatic detection failed (very rare). NOTE: The tone mapper (AgX) or Color Balance RGB are usually better places to make black level corrections.
The Automatic Picker
The module offers very powerful automatic functions, which you can access via the eye dropper icons to the right of the slider.
- Picker (Midtones): Click on it and then draw a rectangle over an area in the image that should have medium brightness (e.g., gray asphalt or skin tones). Darktable automatically adjusts the exposure so that this area lies perfectly in the middle of the histogram.
- Clipping threshold: This value under “Mode: Automatic” determines what percentage of pixels are ignored during automatic adjustment (to avoid taking extreme highlights as a reference). The default value is usually good.
Avoiding common mistakes
- Fear of the histogram:
In this step, the histogram is allowed to “hit” the sides (right side – highlights blown out, left side – blacks crushed). That’s okay! Since we are working in a 32-bit floating-point environment, this data is not lost. The AgX module will retrieve these details later. - Camera exposure correction:
Sometimes you see that the slider is not at0.0, but maybe at+0.5. This happens when darktable automatically accounts for your camera’s ISO sensitivity or exposure compensation. This is normal.
Summary
- Use this module as Step 1.
- Focus only on the midtones / the main subject.
- Ignore concerns about over-/under-exposure at this stage.
Tips
- You can use multiple instances of this module, used with masks, to adjust the exposure in certain areas. For example, to create a vignette or to make an overly bright background a little less harsh.
- Sometimes it is informative to drag the exposure slider down briefly to see how much structure is present in the sky .
For more information, view darktable’s official manual page: “exposure”
Questions about this topic? Discuss it with us in the forum!
January 27, 2026