Why the Shortcut System Can Feel Complicated
Darktable’s shortcut system is basically a “build-your-own-controls” engine. With it, you can:
- Bind shortcuts to UI elements
- Use mouse gestures
- Use scroll-based controls
- Build multi-step combos
- Create module-specific behaviors
- Rebuild the entire workflow around your own muscle memory
It’s a lot—but once you understand the pieces, it becomes one of darktable’s best features.
Understanding the Shortcuts Page in darktable
The Shortcuts page in darktable has two main halves and two search fields.
Each part has a specific job, and knowing how they work makes understanding and customizing shortcuts much easier.
1) Top Half: Action List
The top half shows every action darktable can perform, even if it has no shortcut assigned.
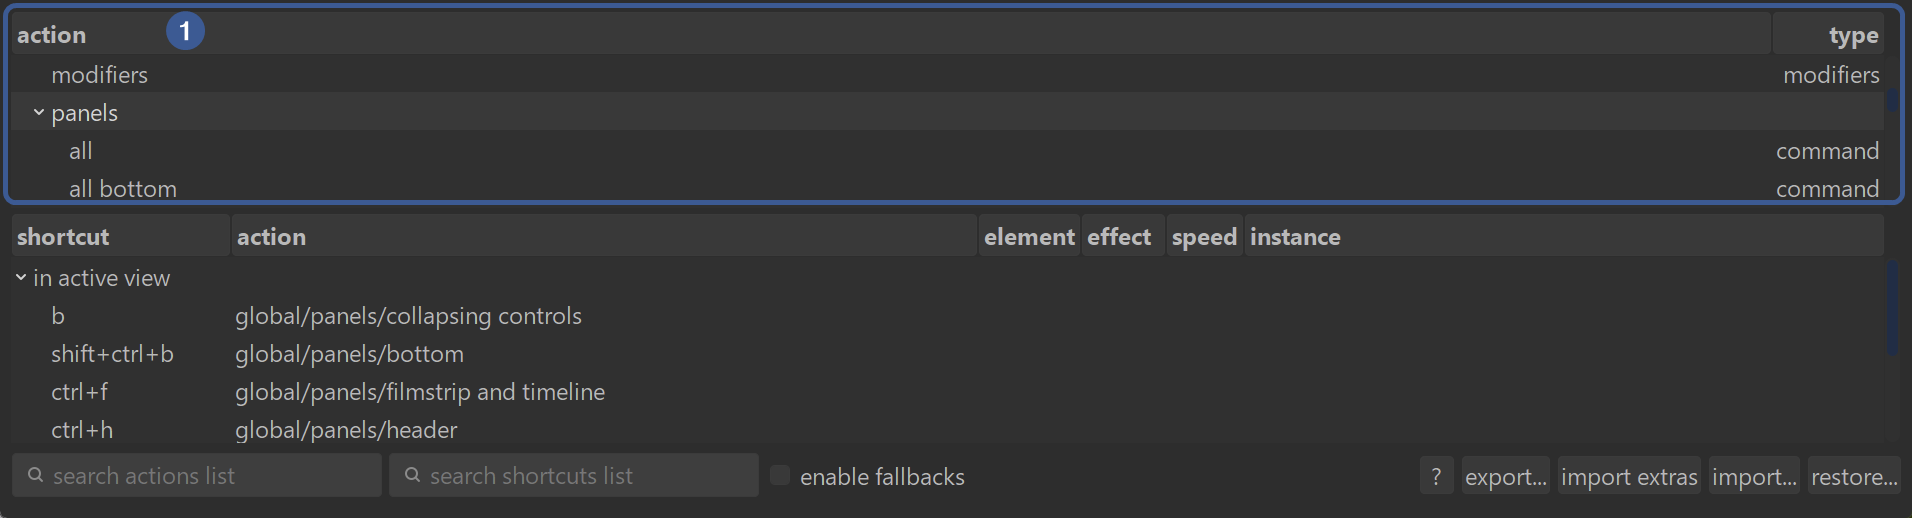
Examples of actions:
- zoom in
- toggle full screen
- export selected
- increase exposure
What you use it for
- Finding an action you want to control with a shortcut
- Assigning a new shortcut to an action
- Changing or removing a shortcut for a specific action
When to use it
- When you know what you want darktable to do
- When you want to add or edit a shortcut for a specific action
Extra behavior
- When you move through the list with the arrow keys, if an action already has a shortcut, that shortcut will appear in the bottom half automatically.
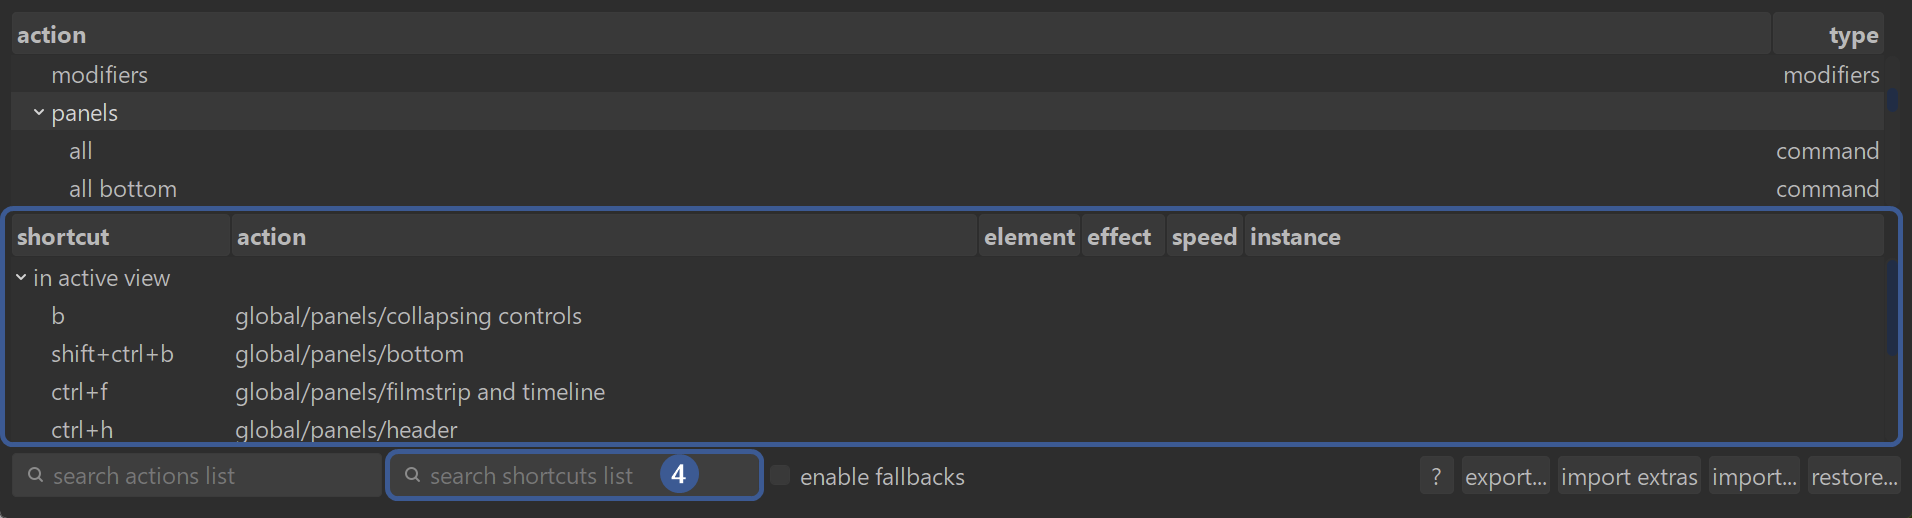
2) Bottom Half: Shortcut List
The bottom half shows only the actions that already have shortcuts assigned.
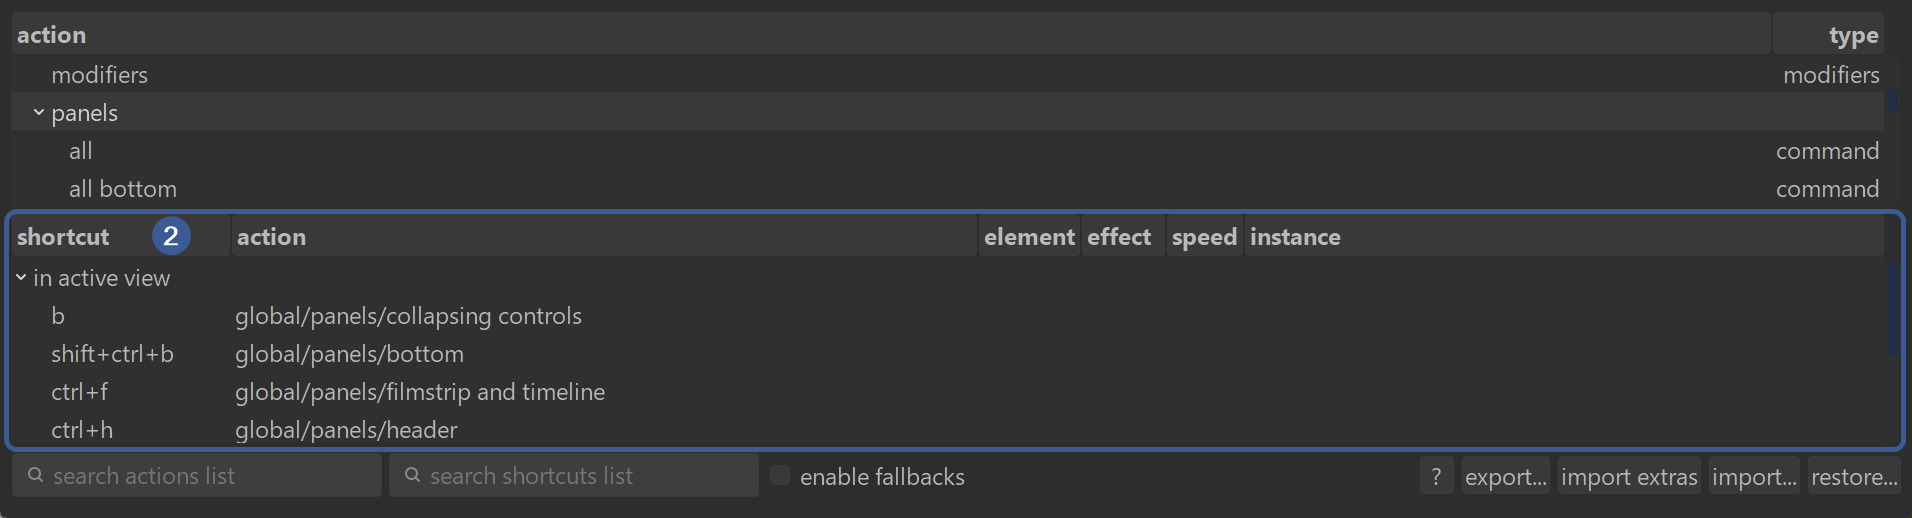
Each row shows:
- the action name
- the shortcut(s) assigned to it
- action component drop-downs*:
- element
- effect
- speed
- instance
*NOTE: Drop-downs appear only for those components that are available for that particular action.
What you use it for
- Seeing which actions already have shortcuts
- Editing or deleting existing shortcuts
- Checking which shortcuts are currently in use
When to use it
- When you want to modify an existing shortcut
- When you want to see all shortcuts related to a topic
- When you want to avoid assigning a shortcut that’s already taken
3) Search Field 1: “search actions list”
This search box filters the top half.
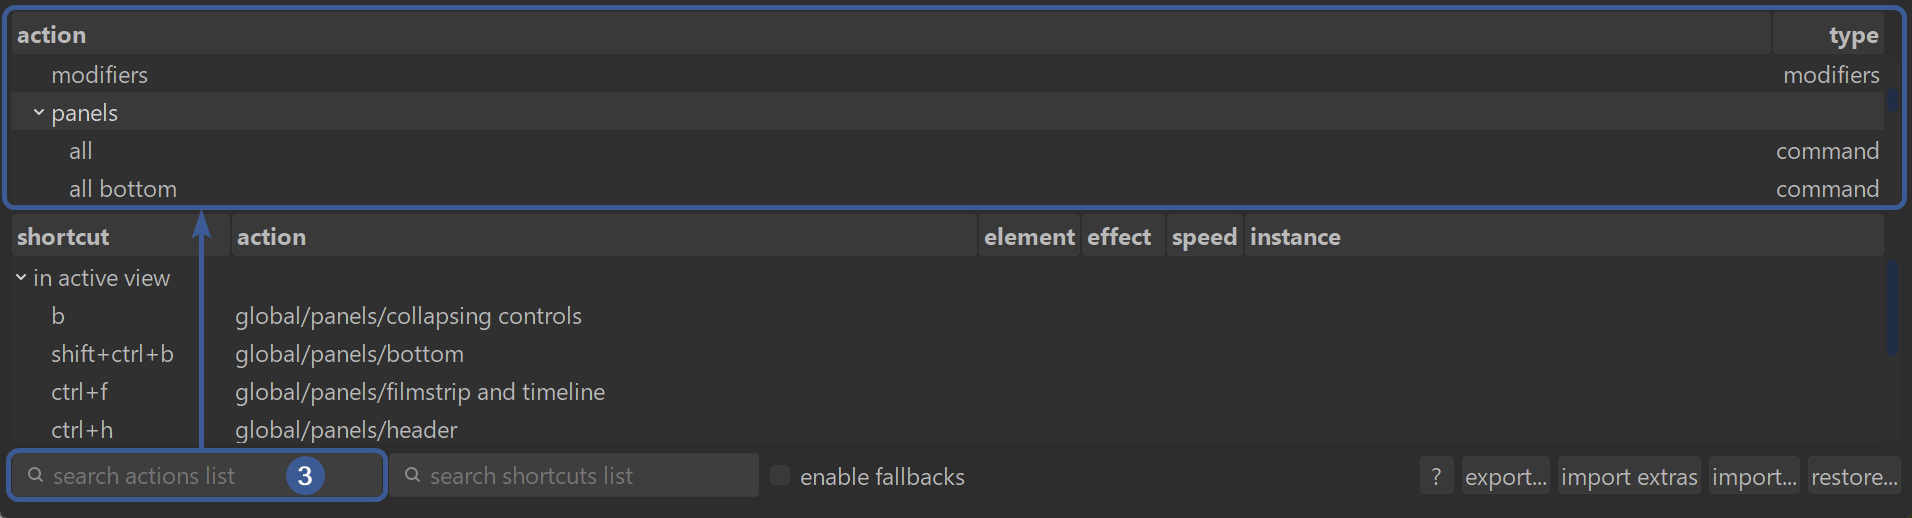
What it searches
- All actions, whether or not they have shortcuts
When to use it
- When you know the action name
- When you want to assign a shortcut to an action
- When you want to find an action that currently has no shortcut
Example
Typing zoom (a) shows and scrolls through all actions with the word zoom in the top half (even if none of them have shortcuts yet):
- force pan/zoom/rotate with mouse (b) – no shortcut yet (c)
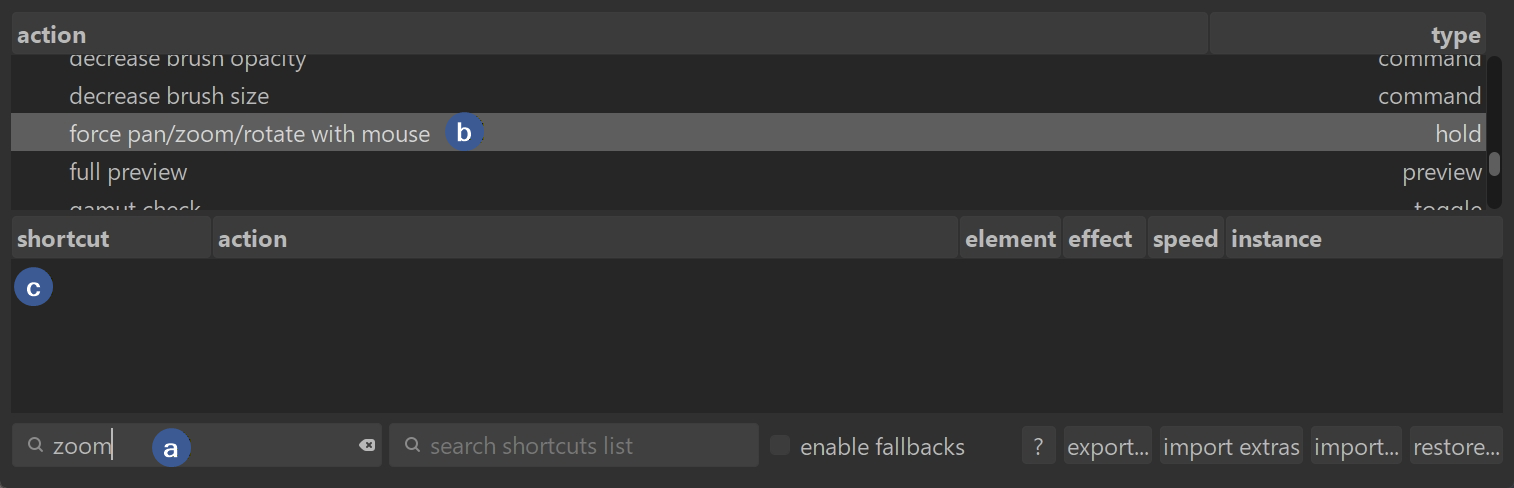
- zoom out (d) – has a shortcut (e)
Extra behavior
- Pressing [enter] does not move to the next search result.
- Use the up and down arrow keys to move through the filtered list.
- Pressing [enter] starts editing the selected action’s shortcut, because [enter] is bound to the action “edit shortcut.”
4) Search Field 2: “search shortcuts list”
This search box filters and scrolls through the bottom half (although it does highlight the action in the top half as well).
What it searches
- Only actions that already have shortcuts
- It searches by action name, NOT by key combination
When to use it
- When you want to see which actions with shortcuts match a topic
- When you want to find all shortcuts related to a feature
- When you want to check whether an action already has a shortcut
Example
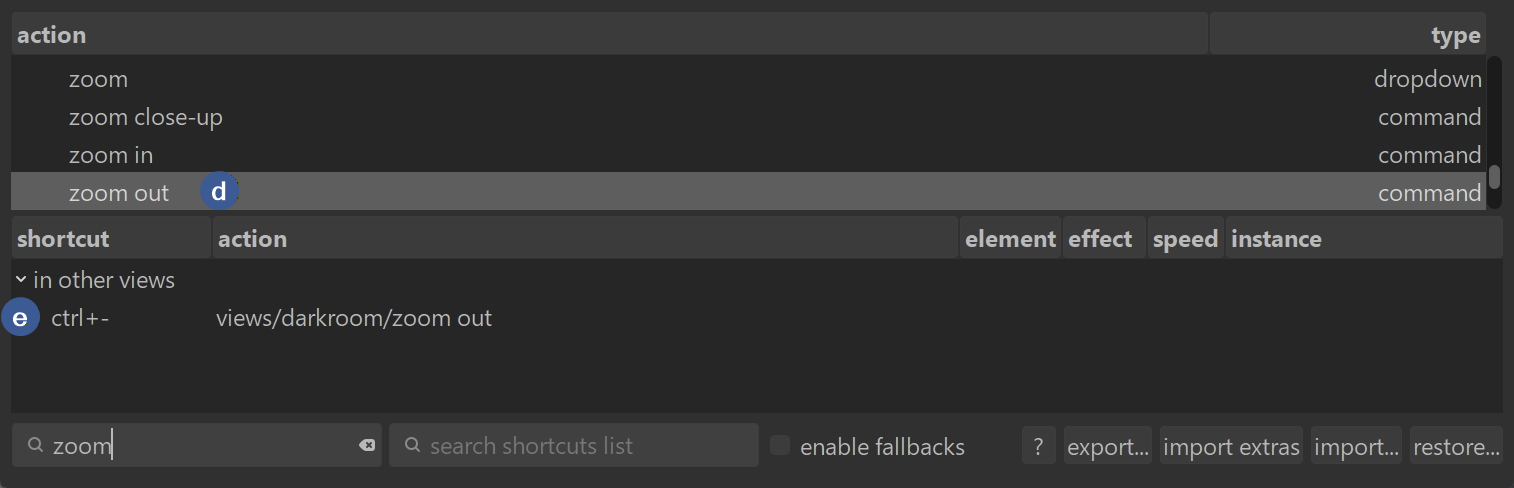
Typing zoom (a) shows and scrolls through all shortcuts in the bottom half that have an action associated with the word zoom; and highlights the action in the top half as well (b):
- zoom
- zoom close-up (c)
- zoom in
- zoom out

Extra behavior
- Like the left search field, Enter does not cycle through results.
- Use arrow keys to move through the filtered list.
- Pressing Enter edits the selected shortcut.
Shortcut Mapping Icon (top-right corner)

The keyboard-shaped icon in the top-right corner of both lighttable and darkroom activates the system for defining shortcuts with on-screen controls (buttons, sliders, module headers, etc.).
NOTE: Right-clicking the icon will open the same screen as found at preferences -> shortcuts.
What this mode does
- Lets you assign shortcuts directly to UI controls, not to actions in the Preferences list
- Allows mouse-based shortcuts (click, move, scroll) combined with keys
- Lets you delete a shortcut by typing the same combination again
- Provides a way to open a detailed configuration dialog for a specific control
- Exits cleanly with a right-click
How it Works
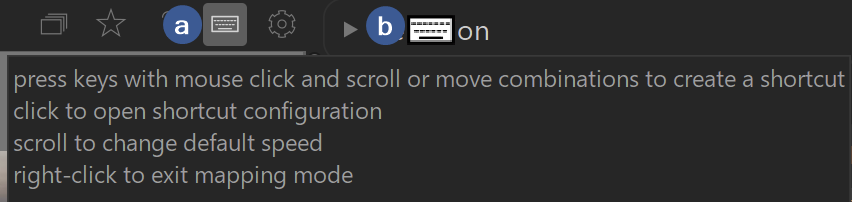
- click the icon to activate it (a)
- hover (b) over a control (button, slider, etc.) and press a keystroke combination
(optionally with mouse click, move, or scroll while holding down the keys)
to define a shortcut for the control- use an existing combination to delete that existing mapping (it will ask for confirmation to overwrite it)
- ctrl+click to switch off overwrite confirmation
- click on a control, module, or screen area to open the dialog for more detailed configuration (
- hover (b) over a control (button, slider, etc.) and press a keystroke combination
- right-click to exit mapping mode
When to use it
- When you want a shortcut tied to a specific on-screen control
- When you want to define shortcuts using mouse gestures + keys
- When you want to configure shortcuts without opening Preferences → Shortcuts
Summary Table
| Area / Field | What It Shows | What It Searches | Best Use | Extra Behavior | Example |
|---|---|---|---|---|---|
| Top Half: Action List | All actions | Full action list | Assigning or editing shortcuts for specific actions | Selecting an action shows its shortcut (if any) in the bottom half | Find “toggle full screen” |
| Bottom Half: Shortcut List | Only actions with shortcuts | Only actions that already have shortcuts | Editing or reviewing existing shortcuts | Shows all shortcuts currently in use | See all shortcuts for zooming |
| Search actions list | Filters top half | Action names | Finding actions to assign shortcuts | Arrow keys move through results; Enter edits shortcut | Search “export” |
| Search shortcuts list | Filters bottom half | Action names (not key combos) | Finding shortcuts related to a topic | Arrow keys move through results; Enter edits shortcut | Search “zoom” |
| Shortcut Mapping Icon (top-right) | Shortcut-definition mode for on-screen controls | None (interactive mode, not a search) | Assigning shortcuts to buttons, sliders, modules, or screen areas | Supports mouse+key combos; typing an existing combo deletes it; right-click exits | Assign a shortcut to a specific slider or module |
Additional Shortcut Concepts
This section fills in the deeper shortcut features that darktable supports.
You don’t need to memorize any of this — it just helps explain why the shortcut system feels so powerful (and sometimes a little wild).

Two Kinds of Actions: “Instant” vs “Directional”
Instant actions (discrete)
These fire once and they’re done.
Examples:
- Toggle a module on/off
- Reset a slider
- Switch views
- Open a preset menu
These work great with simple shortcuts like E, Ctrl+E, or Shift+F.
Directional actions
These need a direction or movement.
Examples:
- Increase/decrease a slider
- Scroll through a dropdown
- Move a crop boundary
- Adjust a mask feather
These require something like:
- key + scroll
- key + mouse movement
- key + drag
Directional shortcuts feel more like “controls” than buttons.
What a Shortcut Can Actually Contain
A shortcut in darktable isn’t just “press a key.”
It can be a whole combo of things:
- A key (single, double, or triple press)
- Optional modifiers (Ctrl, Shift, Alt)
- Up to three mouse clicks
- Optional long-press
- Optional movement (scroll, drag, joystick, etc.)
Examples:
EE double-pressCtrl + E + scrollE + left click + right double-click
You’ll probably never need the crazy ones — but darktable lets you build them.
How darktable Thinks: Widget → Element → Effect
Every shortcut is built from three layers:
Widget
The thing you’re controlling:
- A slider
- A button
- A dropdown
- A module header
Element
The specific part of that widget:
- Slider value
- Slider reset button
- Module enable toggle
- Preset menu
- Instance menu
Effect
What the shortcut does:
- Toggle
- Reset
- Increase/decrease
- Scroll
- Activate
This is why the shortcut editor has so many fields — it’s showing you all three layers.
Extra Elements in Processing Modules
Processing modules (exposure, color balance, tone equalizer, etc.) have special elements you can target:
- show — expand/collapse the module
- enable — turn the module on/off
- focus — activate the module’s on-image controls
- presets — open the preset menu
- instance — manage multiple module instances
- blending — open blend options
- focused controls — control the first/second/third slider of the currently focused module
This is how one shortcut can behave differently depending on which module is “focused.”
Fallbacks (Automatic Shortcut Families)
Fallbacks let darktable automatically create a whole set of shortcuts from one base shortcut.
Example:
If you assign Ctrl + R to a module, darktable can automatically generate:
Ctrl + R→ show/hideCtrl + R + left click→ enable/disableCtrl + R + left double-click→ resetCtrl + R + right click→ presetsCtrl + R + right double-click→ instance menu
Fallbacks are off by default because they can surprise beginners, but they’re powerful once you understand them.
Shortcut Uniqueness Rules
- A shortcut can only do one thing per view (lighttable vs darkroom).
- The same shortcut can do different things in different views.
- An action can have multiple shortcuts, but a shortcut cannot trigger multiple actions in the same view.
This keeps darktable from getting confused.
Importing, Exporting, and Restoring Shortcuts
The shortcut editor includes tools for:
- Exporting your shortcuts to a file
- Importing shortcuts from a file
- Importing “extras” (extra system shortcuts)
- Restoring defaults
- Restoring previously disabled default shortcuts
This is super helpful if you experiment a lot or want to share your setup.
Assigning Keys as Modifiers
You can turn any key or controller button into a modifier (like Ctrl/Shift/Alt).
This is done through the global/modifier action.
It’s great if you want more modifier keys than your keyboard physically has.
Why the Shortcut System Feels So Powerful
Darktable’s shortcut system is basically a “build-your-own-controls” engine.
You can:
- Bind shortcuts to UI elements
- Use mouse gestures
- Use scroll-based controls
- Build multi-step combos
- Create module-specific behaviors
- Rebuild the entire workflow around your own muscle memory
It’s a lot — but once you understand the pieces, it becomes one of darktable’s best features.
February 5, 2026