The Standard Workflow: In 5 + 1 Steps
Whether landscape, portrait, or architecture, 90% of all images can be developed with the same few modules. This workflow is scene-referred, which basically means it works in a way that’s closer to how light behaves in the real world. Because of that, the edits you make tend to behave more predictably and create fewer artifacts.

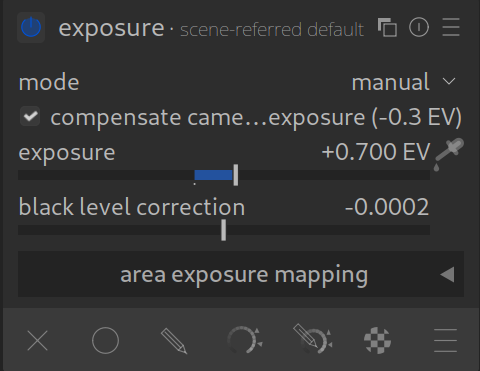
Step 1: Exposure
Goal: Set the brightness of the mid-tones.
- Ignore blown-out highlights or crushed shadows. Focus on the main subject (e.g., the face or the central object).
- Adjust the slider so that this subject looks correctly exposed.
- Tip: Use the automatic picker in the module if you are unsure, drawing the square on the main subject.
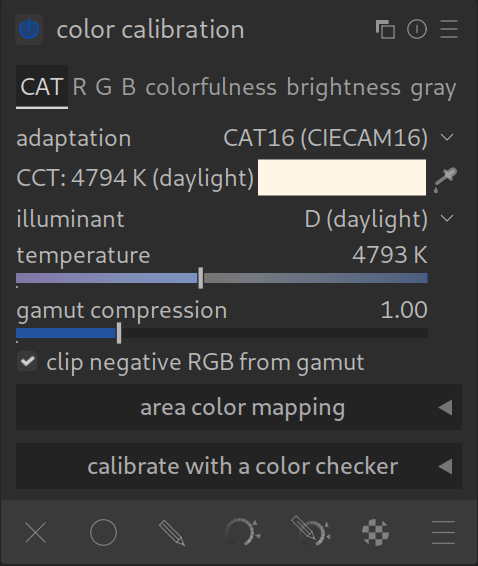
Step 2: Color Calibration
Goal: The correct white balance.
- The “White Balance” module remains at “Camera Reference”.
- Use Color Calibration to adjust the color temperature.
- Why? This module (CAT) works more precisely and prevents color shifts in the highlights better than the “White Balance”.
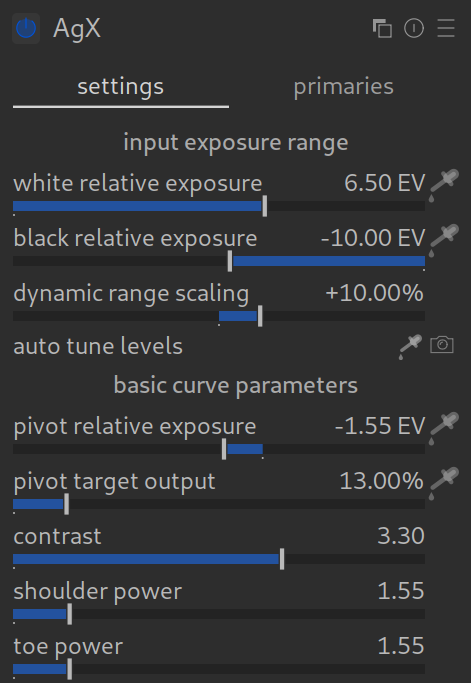
Step 3: AgX
Goal: Taming contrast and dynamic range (tone mapping).
- Here the huge dynamic range of the camera is mapped to the limited range that a monitor can display. This brings the too-bright highlights and too-dark shadows back into the visible range.
- The image gets its “look” and global contrast here.
Step 4: Tone Equalizer
Goal: Local brightness adjustments (dodge & burn).
- If AgX makes the image look good globally, but the foreground is still too dark or the sky too bright, this module comes into play.
- It is the modern replacement for “Shadows and Highlights”.
- Operation: Hover the mouse over the area in the image you want to change and scroll the mouse wheel (if the cursor mode is active).
- Note: If you are familiar with Ansel Adams’ zone system, it is much like that.

Step 5: Color Balance RGB
Goal: Saturation and color grading.
- Here you give the image “pop”.
- Use the “Global Saturation” slider (or “Vibrance” in the preset) to boost colors.
- This is the modern replacement for almost all old color sliders.

Optional: Sharpness, Details & Noise
Once exposure and color are correct, it’s time for details. Here you have several tools to choose from, depending on the goal:
The Designer: Crop
Cropping is often one of the first or last steps.
- Where: Module Crop.
- What: Determines the image section and aspect ratio (e.g., 3:2, 16:9, or square).
- Why: Often the framing straight out of the camera isn’t perfect. Distracting elements at the edges can be removed here, or the horizon can be straightened (if not already done in the Rotate and Perspective module). A good crop can massively improve the image impact.
The Basis: Capture Sharpening (New with darktable 5.4)
- Where: In the Demosaic module.
- What: Simply check the box for “Capture Sharpening”.
- Why: This removes the slight blur of the camera sensor directly at the source. It is the cleanest and fastest way to basic sharpness. Make this the standard!
The Creative: Contrast Equalizer
- Where: Module Contrast Equalizer.
- What: Your tool for “crispness” and “sharpness”.
- How:
- Pull the curve up on the far right for fine sharpness.
- Pull the curve up in the middle for more “clarity” (local contrast/structure).
- Why: It is extremely intuitive. You determine exactly which details should be emphasized (fine pores or coarse structures).
The Architect: Lens Correction
- Where: Module Lens Correction.
- What: Automatically detects your lens and corrects optical errors (distortion, vignetting, chromatic aberration).
- Why: So that lines are straight and the image is technically clean. An absolute must for wide-angle shots and architecture, so buildings don’t look “bulging”.
Denoise (Profiled)
- Where: Module Denoise (Profiled).
- When: Only if necessary (high ISO). Darktable usually detects your camera automatically (some denoise profiles are missing).
Summary: The 5+1 Workflow
Darktable automatically sorts the modules correctly internally (pixelpipe). So you don’t have to worry about where a module is technically located. But for your workflow, this order has proven useful:
- Exposure:
The foundation. Set brightness of mid-tones (main subject). - Color Calibration:
The base color. Correct white balance so that white is actually white. - AgX:
The frame. Set contrast and define black/white point (dynamic range compression). - Tone Equalizer:
The balance. Brighten too-dark shadows or dampen too-bright highlights. - Color Balance RGB:
The look. Increase saturation, shift colors, and give the image character.
+1. Sharpness & Details (Optional):
At the very end, when the look is set.
- Crop
- Capture Sharpening (in RAW)
- Contrast Equalizer
- Lens Correction
- Denoise
January 27, 2026
Hi can you make a similar tutorial or give some tips in the case of b&w conversion? tks!
Thank you for your message. Please take a look at the following page: https://darktable.info/en/darkroom/in-depth/monochrome-from-color-images/
Please get in touch if this does not help.
Best regards, Chris
Hello
Thanks for your reply.
I’ve installed DT latest version but something looks off with the new AgX moduie.
When i open it, the layout goes crazy and half of the right panel goes off-screen.
I’ve tried both full screen and smaller windows, but the issue stays and I cannot operate.
Other modules work just fine.
I’m on MS Windows.
Did I miss something?
Thanks
Sounds to me like a faulty darktablerc file.
You can (normally) find the file at: %LOCALAPPDATA%\darktable\
Rename the file to darktablerc_backup and start darktable. A new file is created.
If that doesn’t help, please get in touch again here: https://discuss.pixls.us/t/darktable-info-discuss-de-en-nl-fr/55505
Thank you very much.
I’m Spanish, my English is very basic, then I’ll use a translator or IA to write here.
I love that what where when….format….
What would be the preferred tool for monochrome conversion?
That’s a very good question.
Try Colour Calibration -> Grey.
There you will find three sliders for R G B.
Best regards, Chris
I Always do crop, straighten and denoising first.
Does the order of processing steps affect the final image quality? Thanks Bro.
Thanks for your question. The order in which you edit the modules has no effect on the result.
If you were to change the order of the modules, then that would be the case. However, to do that, you would have to move them in the right-hand sidebar of the modules, which isn’t normally done.
There can be instances where it would….for example exposure, lens corrections and tone eq can all change the pixel data so if you have already used the auto picker in something like agx and then you add those module or change them you might want to go back and tweak agx….there can be some other issues like leaving denoise off for performance until the end but it can impact color picker selections and so it can be better to work with it on if your computer is fast enough…basically in DT when you open the active module list and click it a second time you see every module in DT in the order that it would be processed….each module serves as the input for the next so you have to take that into account…. also something like parametric masks can be altered if you all of a suddent add instances of certain module that come before the mask was specified…in that case it can be better to move the module above the mask with the parametric mask or to use a raster mask as it won’t change…..esp if you take care to define it early in the pipeline so that changes happen after it….
And lens correction? It sometimes changes the perspective slightly. I always start with lens correction followed by rotate&perspective and then crop.
Thankyou for taking the time to put this guide together.
I am familiar with Dartktable but I would have gained the knowledge required to use the program much more quickly if something like this had been written before.
I hope your work is viewed and used by many people and wish you every success
You want to focus on the new workflow only. That is a clear and useful approach. Remove the reference to the old whitebalance completely, it is irrelevant.
Instead write something like this: The whitebalance can be set according to the camera, or a white reference in the image, or even a color checker. It can also be adjusted for creative creativeness.
I am surprised that “crop” is not mentioned at all. Many tutorials for Lightroom present the following arguments for making it Step Zero, and I think these arguments do not depend on the software used and are valid universally:
* The camera aspect ratio may not match the destination medium (e.g., presentation background 16:9, or Instagram 4:5) aspect ratio.
* Cropping allows you to change the composition by placing the subject(s) in an interesting place and removing distractions. As a bonus, you don’t have to care later about giving the good look to the discarded parts of your photo.
* If you can’t find a compositionally good crop, maybe the photo is bad after all, and realizing this early saves time by not wasting it on color-related edits that will go nowhere.
* Cropping early allows you to see how further edits will look given the uniform background, which is how the photo will be viewed, not in the context of discarded areas.
So please either mention this step explicitly or mention that the workflow is only focused on the look of your photo, not on fixing the composition.
Thanks for your comment. You’re absolutely right. Crop definitely belongs on the +1 list.
We’ll definitely take your suggestion on board and adjust the page accordingly.
I’d argue for cropping (and rotation, perspective correction, and lens correction) early: if you crop out some blown highlight or crushed shadow, there’s no need to worry about them later with AgX or Tone Equalizer…
There’s nothing wrong with cropping at the beginning. Our primary target audience is beginners, which is why we moved that part towards the end.