Instructions: How to install the “Darktable Pro” Preset for your modules
With this file DarktablePro.dtpreset, you get the module selection you really need.
Step 1: Download file
Download the file and unzip it. Remember where you saved it (e.g., in the “Downloads” folder).
Step 2: Open settings
Start darktable and click on the gear icon (Settings) in the top right.

Step 3: Import
- In the settings window, select the “Presets” tab.
- Click on the “Import…” button at the bottom right.
- Locate your downloaded file
DarktablePro.dtpresetand click “Open”. - You can now close the settings window.
Step 4: Activate preset
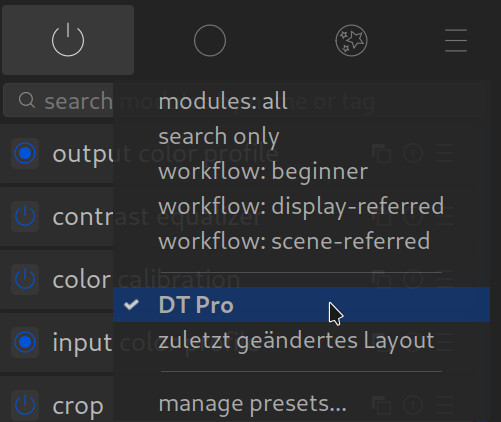
- Switch to the Darkroom.
- Look on the right side under the histogram for the heading “Module groups”.
- Click on the icon with the three horizontal lines (hamburger menu) to the right of it.
- Now select “DT Pro” (or the name of the file) from the list.
Done!
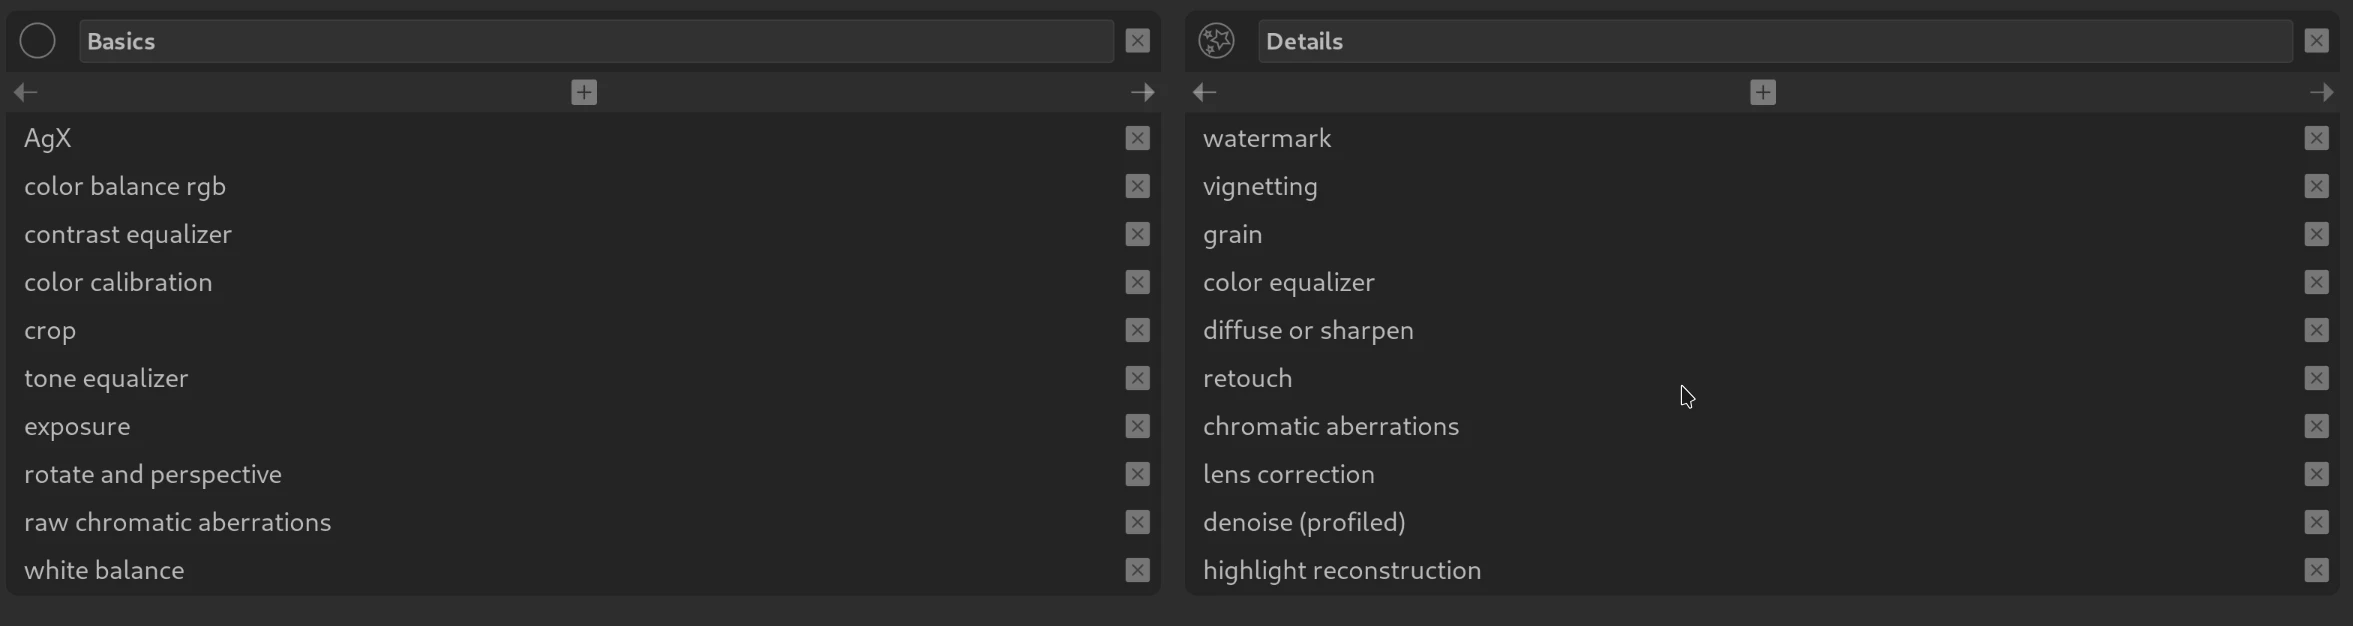
Now you have exactly the tidy and professional view with the two tabs “Basics” and “Details”.
This compilation focuses strongly on the modern “Scene-referred” workflow, which is the current standard in darktable and delivers the best results.
Here is a brief classification of why this list was chosen:
Group 1: Basics
These modules form the foundation of image editing. They control brightness, basic colors, and the image crop.
- AgX: A modern module for “tone mapping” (converting the huge dynamic range of the camera into an image displayable on your monitor without odd coloring). It is known for rendering colors in very bright areas (highlights) particularly natural and “film-like”.
- Color Balance RGB: The heart of color and contrast in the modern workflow. With this, you control saturation and vibrance and can adjust the contrast separately for shadows, midtones, and highlights (Color Grading).
- Contrast Equalizer: Used to control the “crispness” of the image. It can highlight fine details (impression of sharpness) or emphasize coarse structures (clarity).
- Color Calibration: Works hand in hand with white balance. It ensures physically correct colors and is the modern tool for removing color casts or performing black and white conversions.
- Crop: The standard tool to choose the image section and set the aspect ratio (e.g., 3:2 or 16:9).
- Tone Equalizer: The best tool to brighten shadows and darken highlights without making the image look artificial or “flat” (replaces the outdated “Shadows and Highlights”).
- Exposure: The first step of almost every edit. Here you set the global brightness of the image.
- Rotate and Perspective: For straightening the horizon or correcting converging lines (e.g., in architectural photos).
- Raw Chromatic Aberrations: A technical correction that takes effect very early in the processing chain to remove color fringes on hard edges.
- White Balance: The technical basis for color temperature. In the modern workflow, this is often only set to “Camera reference”, while the actual creative work happens in the Color Calibration module.
Group 2: Details
These modules serve technical corrections, detailed work, and creative fine-tuning.
- Watermark: Automatically inserts your logo or name into the image.
- Vignetting: Adds an artistic darkening (or brightening) in the corners to direct the viewer’s gaze to the center of the image.
- Grain: Simulates analog film grain to give the image more texture and a classic look.
- Color Equalizer: The successor to the old Color Zones. With this, you can selectively change individual colors (e.g., desaturate the green of the meadow or make the sky darker), based on hue, saturation, and brightness.
- Diffuse or Sharpen: An extremely powerful module. It can not only sharpen images but also add local contrast or create a dreamy “bloom” effect (glow).
- Retouch: The tool for removing distracting elements like sensor spots, skin blemishes, or trash in the background.
- Chromatic Aberrations: Another stage for removing purple or green color fringes if the RAW module didn’t catch everything.
- Lens Correction: Automatically corrects distortions (e.g., fisheye effect) and vignetting, based on the lens used.
- Denoise (profiled): Removes digital image noise (ISO noise), tailored to the exact camera model.
- Highlight Reconstruction: Attempts to rescue image information in areas that are so bright that they appear “blown out” (white).
Conclusion:
With this view, you have everything you need for 99% of all images. The big advantage of this preset (“DT Pro”) is that it hides outdated modules (like Base Curve, Shadows and Highlights, or Global Tone Map), which one should actually no longer use today.
If you focus on these modules, you learn the “modern” darktable right away.
February 10, 2026
Glad I found your site – was getting confused by all the legacy YouTube videos.
Glad you like the site!
Best regards, Chris