January 10, 2026
Styles in Darktable are what “Presets” are in Lightroom – but much more powerful. You can save any combination of modules and apply them to other images with a single click. NOTE: In darktable, “presets” refer to saved settings for individual modules (more information found in: Presets).
What are Styles used for?
Styles can be used for different reasons:
- Basic Development: A starting setup for your camera (e.g., “Sony A7R4 ISO 100”).
- Creative Looks: A specific color look (e.g. natural skin and vibrant colors).
- Problem Solvers: A set of modules for specific situations (e.g., “Remove High ISO Noise”).
- Repetitive Steps: If you find yourself using the same modules, with close to the same settings for those modules (such as a batch of photos from the same session; or creative touches you frequently apply), you can create a style that can apply many steps to many photos at one time.
Creating a Style (Step by Step)
- Edit an image exactly how you want it.
- Preparation (Important Tip): Before saving, consider carefully which modules should be active immediately and which you might just want to have “at hand”.
- You can disable modules in the right panel before creating the style.
- If you then include them in the style, they will be added to the image when applying the style, but remain inactive.
- Advantage: You don’t have to search for the module first, but can activate it with a single click if you need it for this specific image.
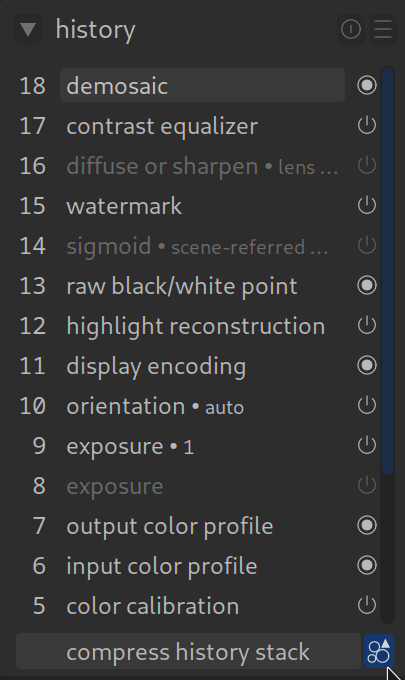
- Go to the top of the History Stack (left side) and click on the “create style” icon (the small icon that looks like a sheet of paper with a corner).
- The dialog window opens (see screenshot).
Understanding the Selection Menu
This is where most mistakes happen. You have to decide what goes into the style:
- Checkmark set: This module is saved in the style.
- No checkmark: This module is ignored.
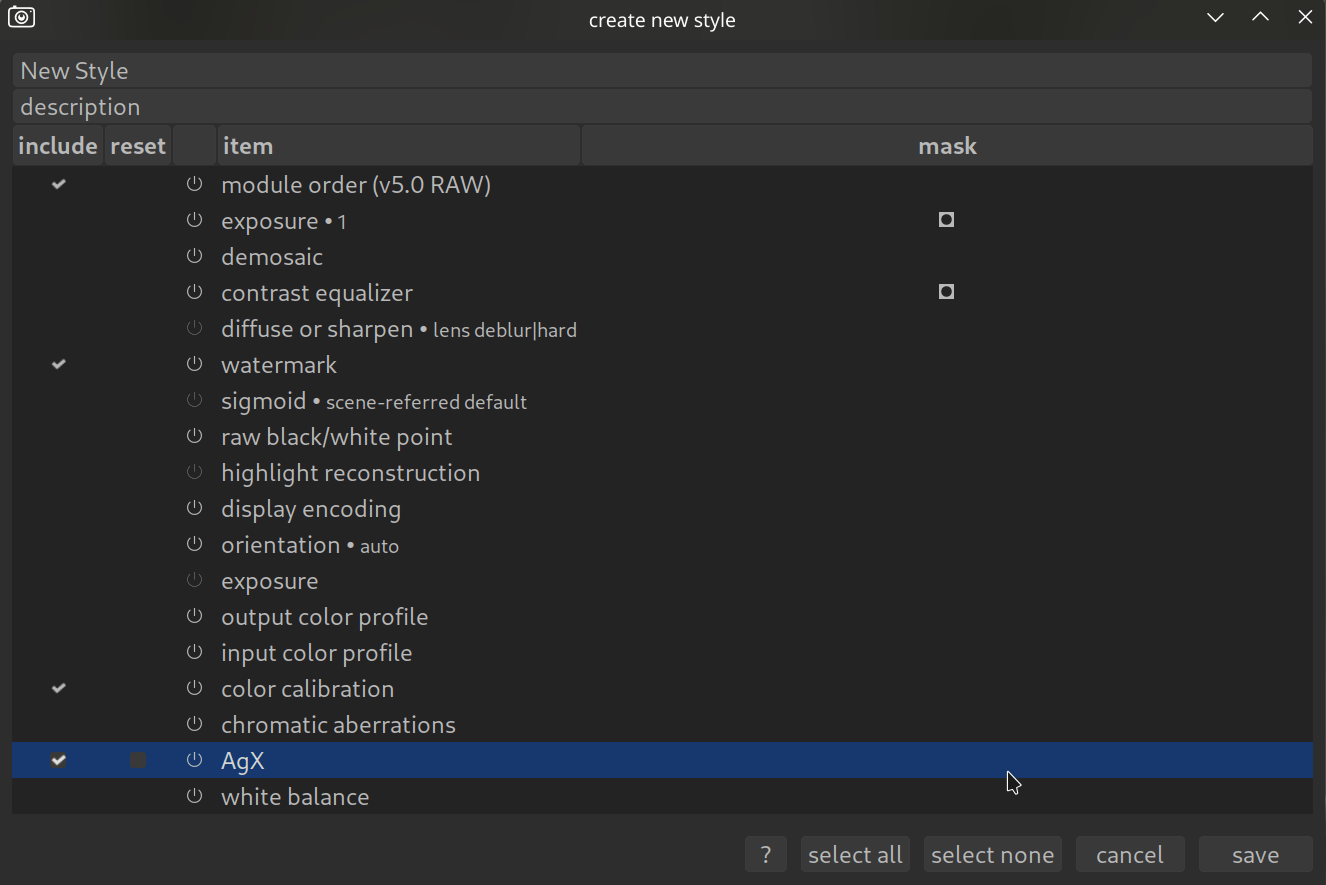
⚠️ Important Warning:
Be careful with modules that are image-specific or hardware-dependent!
- White Balance: Should usually not be in the style, as every image has different light.
- Orientation / Crop: Only save if you really want to crop every image the same way.
- RAW Black/White Point: Only save if the style is intended for a certain brand/model of camera. If you send this style to someone with another camera, their images will look broken.
Tip: Saving Masks and Shapes
As you can see in the screenshot above (the small square symbol next to exposure), Darktable can even save drawn masks in a style.
This is brilliant for recurring tasks, e.g.:
- A gradient filter that darkens the sky.
- A vignette that fits your lens exactly.
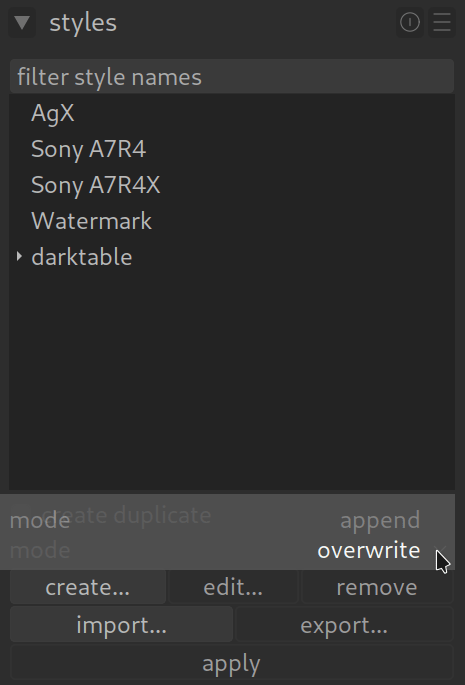
Applying Styles: “Append” vs. “Overwrite”
When you apply a style to a new image (in the Lighttable or Darkroom), Darktable often asks you for the mode. This is crucial:
- Append: The modules from the style are activated in addition to what you have already done. This is the safe standard.
- Overwrite: The style deletes your previous history and replaces it completely. Caution: Your previous work on the image is then gone!
Editing a Style
1. include
- What it does: This is the main switch.
- Checkmark set: This module becomes part of the style. When you apply the style later, this module is activated.
- No checkmark: The module is ignored. It does not end up in the style.
- Example: You want a “Black & White” style. You check Color Calibration (for the B&W channel mixer), but not Exposure, so that the brightness of the original image is preserved.
2. reset
- What it does: This is a “cleanup command”.
- Checkmark set: Before the style is applied, Darktable resets this module to its default values.
- When you need this: Imagine you have already tweaked the Color Balance RGB wildly on an image. But your style should have a very specific look.
- Without
reset: Your style places its settings on top of your wild changes (Chaos!). - With
reset: Your style first deletes your changes in the module and then cleanly applies its own.
- Without
3. update
- What it does: This is only relevant if you are editing an existing style (not when creating a new one).
- Checkmark set: Overwrites the settings in the style with the settings of the current image you have open.
- When you need this: You realize: “Darn, my ‘Summer Look’ style is way too yellow.”
- You apply the style to an image.
- You correct the yellow in the image.
- You open the “Edit Style” dialog.
- You click
updateon Color Balance RGB. - Now the style has learned the new, corrected values from your image.
4. keep
- What it does: This is the “protection switch”.
- Checkmark set: If you apply this style to an image that already has this module activated, the style does not touch it.
- When you need this:
- You have a style for “Color Look”.
- But you have already painstakingly set the Crop in the image.
- If
cropis marked withkeepin the style, the style says: “Oh, you’ve already cropped? Then I’ll keep your crop and won’t overwrite it with mine.”
Summary
- Include: “Take this module into the style.”
- Reset: “Delete previous settings in this module before the style is applied.” (Important for clean looks).
- Update: “Learn the new settings from the current image.” (Only when editing styles).
- Keep: “If the module is already active in the target image, don’t touch it.” (Perfect for crop or lens correction).