December 21, 2025
AgX – The new standard for colors & contrast (from Darktable 5.4)
With Darktable 5.4, a new, powerful module enters the darkroom: AgX. It is based on the color transformation of the same name from the 3D software Blender and has the potential to replace Filmic RGB and Sigmoid as the standard.
The great implementation of AgX for Darktable was done by kofa (István Kovács). https://discuss.pixls.us/u/kofa/summary
What makes AgX (different)?
The problem so far:
When colors become extremely bright (e.g., a sunset or colorful spotlights at concerts), they often look artificial in digital processing. They burn out to white too quickly or shift colors strangely (the famous problem where a rich orange suddenly turns into a dull yellow).
The solution with AgX:
AgX imitates how classic analog film reacts to light.
The trick: Instead of harshly clipping bright colors, AgX gently washes out colors in the brightest areas. This sounds like a disadvantage, but it is exactly what our eyes perceive as “natural”.
The result: Your images look more realistic in the highlights and have richer colors (in the rest of the photo) without you having to make complicated adjustments.
The two faces of AgX: Settings & Primaries
Before we start, a quick look at the structure. The module is divided into two tabs:
- Settings: You will spend 95% of your time here. Here you control contrast, brightness, and the general look.
- Primaries: This is the engine room. Here it is defined how AgX fundamentally interprets and transforms colors. For the beginning, you can safely ignore this tab.
The most important rules for AgX
- There can be only one: Never use AgX together with Filmic RGB, Sigmoid, or the Base Curve. There can be only one tone mapper!
- Order: Everything before AgX is “Scene-Referred” (physically correct light), everything after is “Display-Referred” (adapted for the monitor).
- Exposure first: Set your midtones (the main subject) correctly in the Exposure module first. AgX then takes care that highlights and shadows “fit in”.
Operation: Step by Step
1. The Start (Presets)
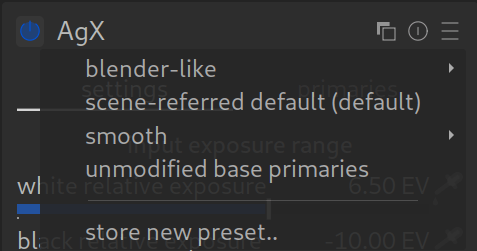
AgX comes with various presets that make starting easier. Depending on the version, the names may vary slightly, but the logic remains the same:
- Blender-like: The classic look, known from the 3D software Blender. It often offers a choice between “Base” (standard) and “Punchy” (more contrast).
- Scene-referred default: The standard starting point for a neutral workflow.
- Smooth: A softer look that resembles the behavior of the Sigmoid module. Here too, there are often “Base” and “Punchy” variants.
- Unmodified base primaries: A technical starting point without special color adjustments.
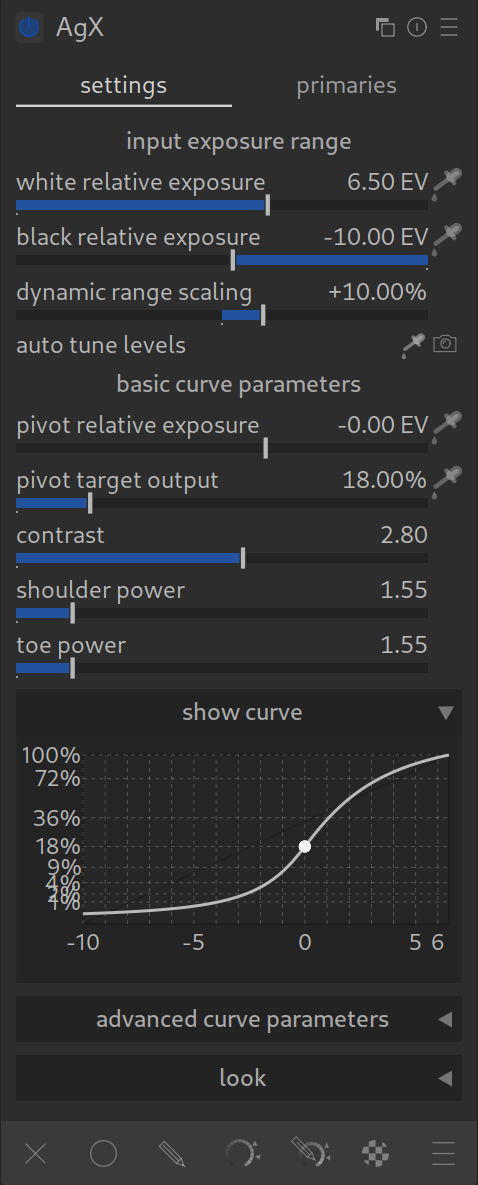
2. Input Exposure Range

Here you tell AgX where black and white lie in your image.
- It is best to use the camera icon (“Read exposure”) first. This usually provides a very good starting value.
- If the result does not fit (e.g., image too dark), use the pickers next to the sliders to manually measure the black and white points in the image.
Important: The Histogram!
The histogram is your best friend. Always keep an eye on it when you move sliders here.
- The goal: The curve should make good use of the available space.
- Watch out if you are clipping highlights or shadows. This is allowed if you want to do it artistically (e.g., deep black shadows), but you should do it consciously.
- Also observe the graph in the module itself – it shows you visually how the curve runs.
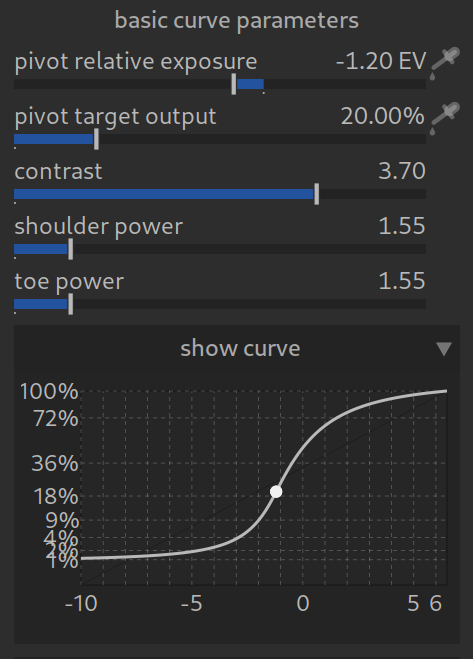
3. The Curve (Base Parameters)
AgX offers a curve that behaves similarly to Filmic but is more robust.
- Pivot: Select your main subject (e.g., a face) with the picker. AgX ensures that the contrast is highest there.
- Contrast: Controls the steepness of the curve.
- Advanced Curve Parameters: Here you find settings like Shoulder & Toe. With these, you determine how gently the highlights and shadows roll off.
- Tip: Here too: One eye on the image, the other on the histogram and the curve graph!
4. Advanced Curve Parameters
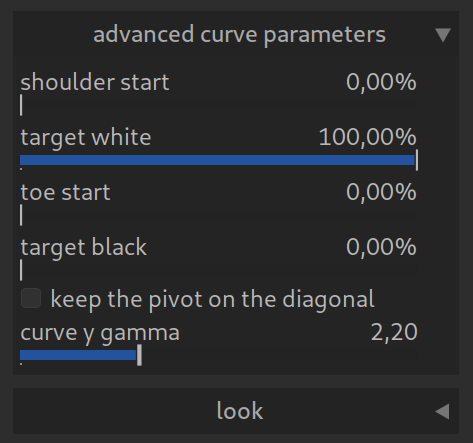
Here you can exactly control how the curve runs and how the image is output. For the beginning, you can usually leave the default values, but here lies a lot of potential for special looks:
- Shoulder start / Toe start:
These sliders determine when the curve starts to flatten out in the highlights (shoulder) or shadows (toe).
In other words: You control how much detail and contrast remains in the extremely bright or dark areas before they transition to pure white or black. - Target white / Target black: Here you define the absolute white and black point of the output.
Creative Tip: If you increase Target black slightly (e.g., to 1-2%), you get this modern “matte look” with slightly faded, not quite deep black shadows. - Keep the pivot on the diagonal: Ensures that your selected mid-gray point (Pivot) remains stable, even if you change the contrast.
- Curve y gamma: This is the gamma correction for the output. 2.20 is the standard value for sRGB and most monitors. You should generally not change this value unless you have a specific reason.
5. The “Look” (Post-processing)

At the very bottom of the module, you find sliders for the final touch:
- Saturation: Global color strength.
- Brightness & Lift: To brighten shadows or create a “faded” look (dull black values).
- Preserve Hue: An important slider! Since AgX strongly manipulates colors in the highlights, you can partially retrieve the original hue here. 0% is the pure “AgX look”, higher values bring back the original colors (at the expense of naturalness in extremely bright areas).
For Pros: The “Primaries” (Color Space Magic)
In the “Primaries” tab (or in the advanced menu), you can exactly control how AgX “bends” the colors.
- Attenuation: How strongly should Red/Green/Blue be desaturated when they get brighter?
- Rotation: Rotates the hue (e.g., does Red become more Yellow or Magenta in the highlights?).
- Purity Boost: Tries to pump “purity” back into the colors after the curve.
Conclusion
AgX is minimally more complex than Sigmoid, but more powerful than Filmic. It is the best choice for images with extreme lighting situations (concerts, sunsets, artificial light), as it keeps colors stable where other modules fail.
Pro Tips for Experimenting:
- Playground: This module invites you to experiment – both with brightness/contrast and with colors. You can’t break anything!
AgX Quick Start: The 5 Most Important Sliders
You don’t have to understand every switch. For almost all images, it is enough to adjust these five values:
1. Pivot – Input & Output
This is your anchor point for brightness.
- What to do? Click on the picker next to Pivot Input and select an area in your image that should be “mid-bright” (e.g., skin in the face or a gray stone).
- Effect: AgX ensures that this area remains correctly exposed, no matter how strongly you change the contrast.
2. Contrast
Controls how punchy the image looks.
- What to do? Drag the slider to the right for more “punch”, to the left for a softer look.
- Tip: AgX often tolerates a bit more contrast than other modules.
3. Target Black
Determines how dark the deepest shadows are.
- What to do?
- 0%: Technically perfect black.
- 1-2%: Modern “matte look” (slightly faded shadows), very popular for portraits and lifestyle.
4. Target White
Determines the brightest point in the image.
- What to do? Adjust this value if your highlights look too aggressive or you want to darken the image overall slightly without losing the shadows.
Pro Tip: Ignore the “Primaries” tab completely at the beginning. Focus only on these sliders in the “Settings” tab.

thanks for your answer s maybe add in the article “In Darktable, the pixel pipeline (the order in which the image is processed) always runs from the bottom to the top.” because beginners may ignore this point if nobody tell them before 🙂
Hi,
“Order: Everything before AgX is “Scene-Referred” (physically correct light), everything after is “Display-Referred” (adapted for the monitor).”
Can you confirm the process begins at the bottom of the stack of modules ? From the bottom to the top ? So “before” is under the AgX module ?
Hi,
Yes, you are absolutely correct!
In Darktable, the pixel pipeline (the order in which the image is processed) always runs from the bottom to the top.
“Before AgX” means all modules that are listed below the AgX module in the right-hand panel. These operate in the linear, scene-referred space (physically correct light).
“After AgX” means all modules listed above AgX. These operate in the display-referred space (adapted for your monitor).
So, the image data flows upwards like a fountain: starting at the bottom (RAW file) -> going through Exposure, Color Balance, etc. -> hitting AgX (Tone Mapping) -> and finally going to the top (Output).
Great question!