December 6, 2025
The Master Class.
In Darktable, you can apply almost any module to the whole image – or just to a part of it. For this, we use masks. But Darktable strictly distinguishes between two types here. Once you understand this concept, you have enormous creative power at your disposal!
Note: Masks are extremely powerful, but don’t forget: They are just one part of the toolbox. Together with the ability to use modules multiple times (multi-instances) and various blending modes, this makes Darktable fantastic software.
Here is the guide so you can get started right away.
Step 0: Where do I find the masks?
The genius of Darktable: Every processing module has a built-in mask function. Whether Exposure, Color Balance, or Sharpen – you always find the controls in the same place.
At the very bottom of every module, you will find a bar called “Blending”.
There you see various icons (from left to right):
- Off: The module affects the entire image (default).
- Uniform: Affects the entire image, but with adjustable opacity.
- Drawn mask: The brush. For manual painting.
- Parametric mask: The sliders. Selection by brightness or color.
- Drawn & parametric: The combination of both.
- Raster mask: Here you can reuse masks from other modules (for advanced users).
- Settings: For details on blending.
As soon as you click one of these icons, the corresponding tools open directly below.
1. Drawn masks (The Brush)
This is the easy part. You paint manually where the effect should go.
- Brush: For freehand painting.
- Circle/Ellipse: For faces or vignettes.
- Gradient: To darken the sky, for example.
- Path: To cut out complex objects precisely.
Important Shortcut:
When you have placed a shape (e.g., circle), move the mouse over the line and use the mouse wheel + Shift to soften the edge (feathering). This prevents hard transitions.
More Pro Shortcuts:
- Ctrl + mouse wheel: Changes the opacity of the brush.
Attention: If a mask doesn’t seem to do anything, it’s often because Darktable remembered a low opacity from the last use! - Ctrl + click (Brush): If you set the opacity low, you can paint multiple strokes over each other while holding the Ctrl key and build up the mask slowly.
You can find more details on the many possibilities (e.g., drawing paths) in the Darktable manual.
2. Parametric masks (The Automatic)
Here it gets exciting – and here lies the trap.
Instead of painting, you tell Darktable: “Select everything that is bright” or “Select everything that is red”.
The Trap: The 4 Triangles (Input/Output)
When you open a parametric mask (e.g., the “L” tab for Lightness/Luminance), you see small triangles at the top and bottom. This is not a normal slider!
Imagine it as a trapezoid:
- The filled triangles (inside): Everything between these two points is selected 100%.
- The empty triangles (outside): Everything outside these points is not selected at all.
- The area in between: Here the effect is gently faded out (soft transition).
The most common mistake:
The triangles are too close together. This creates extremely hard, pixelated edges in the image.
- Solution: Pull the outer (empty) triangles far away from the inner ones. The wider the distance, the softer and more natural the transition.
Shortcuts for the sliders:
- Double click on the bar resets the values.
- Key ‘c’ (while the mouse is over the bar): Shows the selected mask channel briefly as a black and white image.
- Key ‘m’: Toggles the mask display on/off.
- Invert: Use the small switch (+/-) next to the bar to invert the selection.
Tip: You can also combine multiple channels (e.g., Lightness ‘L’ and Hue ‘h’) to make very precise selections. This also works excellently in combination with a drawn mask!
3. Combined masks
You can mix both!
- Example: You only want to change the red T-shirt of a person.
- Step 1: Use a parametric mask (color) to select everything red in the image. (Problem: A red car in the background is also selected).
- Step 2: Additionally use a drawn mask (circle) around the person.
- Result: The effect only works where “Red” AND “Circle” meet.
4. Can’t see anything? (The yellow button)
Often you don’t know what you have actually selected.
- Click on the icon “Show mask” (circle with dashes) at the bottom right of the module or simply press the ‘m’ key.
- Your selection is now overlaid in bright yellow. Everything that is yellow is processed. Everything that remains gray is not touched.
5. The Mask Manager (Recycling)
On the left in the panel, you will find the “Mask Manager”. This is where drawn masks are mainly managed and saved.
- The trick: You can simply reuse a mask that you painted in the “Exposure” module for the sky in the “Color Balance” module.
- The Mask Manager is a powerful tool in itself. You can find details in the manual.
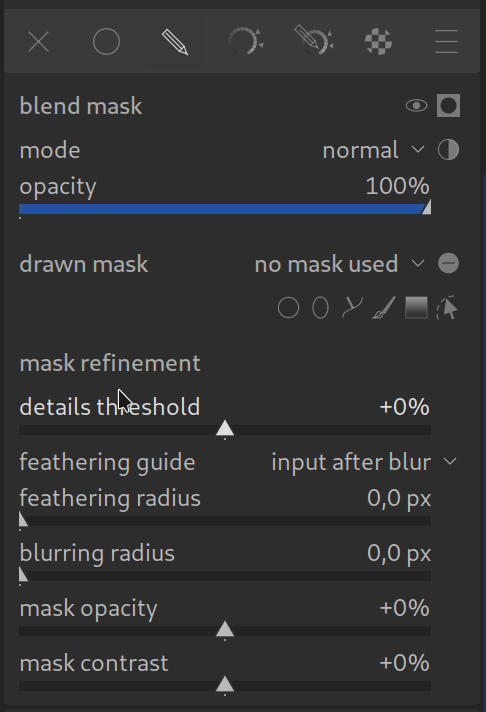
Pro Tip: Softening masks
If your mask still looks patchy despite soft edges (often happens with parametric masks in the sky):
- Go to the very bottom of the mask menu to “Mask refinement”.
- Feathering radius: Increase this radius. This is immensely important for drawn masks to avoid hard transitions!
- Details threshold: This slider influences how strongly the mask adheres to fine details. Experiment with this to perfect the selection.