December 6, 2025
AgX – The new standard for colors & contrast (from Darktable 5.4)
With Darktable 5.4 (Christmas 2025), a new, powerful module enters the darkroom: AgX. It is based on the color transformation of the same name from the 3D software Blender and has the potential to replace Filmic RGB and Sigmoid as the standard.
What makes AgX different?
The main problem with previous tone mappers (like Filmic) is the so-called “Notorious 6” problem: When colors become very bright (e.g., a glowing red LED or a sunset), they tend to look unnatural or drift into pure white/yellow/cyan (“skewing” of color channels).
AgX solves this with a trick:
It manipulates the colors before the contrast curve is applied. It essentially builds its own color space, rotates and desaturates colors specifically in the highlights so that they look natural when brightened – similar to analog film.
The two faces of AgX: Settings & Primaries
Before we start, a quick look at the structure. The module is divided into two tabs:
- Settings: You will spend 95% of your time here. Here you control contrast, brightness, and the general look.
- Primaries: This is the engine room. Here it is defined how AgX fundamentally interprets and transforms colors. For the beginning, you can safely ignore this tab.
The most important rules for AgX
- There can be only one: Never use AgX together with Filmic RGB, Sigmoid, or the Base Curve. There can be only one tone mapper!
- Order: Everything before AgX is “Scene-Referred” (physically correct light), everything after is “Display-Referred” (adapted for the monitor).
- Exposure first: Set your midtones (the main subject) correctly in the Exposure module first. AgX then takes care that highlights and shadows “fit in”.
Operation: Step by Step
1. The Start (Presets)
AgX comes with various presets that make starting easier. Depending on the version, the names may vary slightly, but the logic remains the same:
- Blender-like: The classic look, known from the 3D software Blender. It often offers a choice between “Base” (standard) and “Punchy” (more contrast).
- Scene-referred default: The standard starting point for a neutral workflow.
- Smooth: A softer look that resembles the behavior of the Sigmoid module. Here too, there are often “Base” and “Punchy” variants.
- Unmodified base primaries: A technical starting point without special color adjustments.
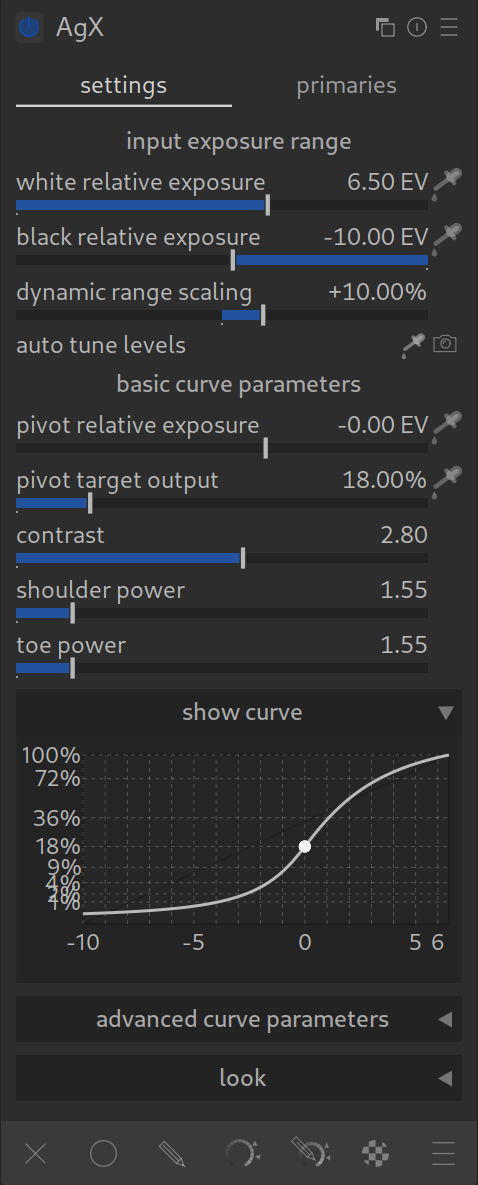
2. Input Exposure Range
Here you tell AgX where black and white lie in your image.
- Use the pickers for black and white points or the button “Read exposure” (camera icon).
- Important: The Histogram!
The histogram is your best friend. Always keep an eye on it when you move sliders here.- The goal: The curve should make good use of the available space.
- Watch out if you are clipping highlights or shadows. This is allowed if you want it artistically (e.g., deep black shadows), but you should do it consciously.
- Also observe the graph in the module itself – it shows you visually how the curve runs.
3. The Curve (Base Parameters)
AgX offers a curve that behaves similarly to Filmic but is more robust.
- Pivot: Select your main subject (e.g., a face) with the picker. AgX ensures that the contrast is highest there.
- Contrast: Controls the steepness of the curve.
- Advanced Curve Parameters: Here you find settings like Shoulder & Toe. With these, you determine how gently the highlights and shadows roll off.
- Tip: Here too: One eye on the image, the other on the histogram and the curve graph!
4. Advanced Curve Parameters
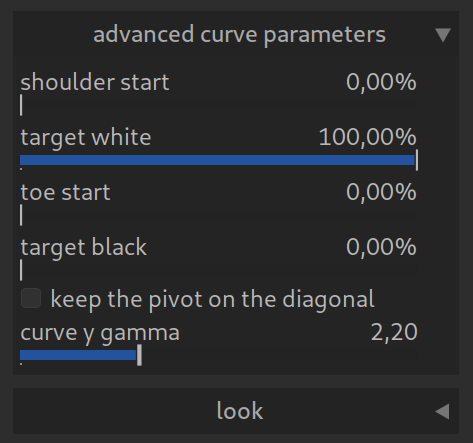
Here you can control exactly how the curve runs and how the image is output. For the beginning, you can usually leave the default values, but there is a lot of potential for special looks here:
- Shoulder start / Toe start: These sliders determine at which point the curve begins to flatten in the highlights (shoulder) or shadows (toe).
- Target white / Target black: Here you define the absolute white and black point of the output.
Creative Tip: If you increase Target black slightly (e.g., to 1-2%), you get this modern “matte look” with slightly faded, not quite deep black shadows. - Keep the pivot on the diagonal: Ensures that your chosen middle gray point (pivot) remains stable, even if you change the contrast.
- Curve y gamma: This is the gamma correction for the output. 2.20 is the standard value for sRGB and most monitors. You should generally not change this value unless you have a specific reason.
5. The “Look” (Post-processing)
At the very bottom of the module, you will find sliders for the final touch:
- Saturation: Global color strength.
- Brightness & Lift: To brighten shadows or create a “faded” look (flat black values).
- Preserve Hue: An important slider! Since AgX manipulates colors strongly in the highlights, you can partially retrieve the original hue here. 0% is the pure “AgX look”, higher values bring back the original colors (at the expense of naturalness in extremely bright areas).
For Pros: The “Primaries” (Color Space Magic)
In the “Primaries” tab (or in the advanced menu), you can control exactly how AgX “bends” the colors.
- Attenuation: How strongly should Red/Green/Blue be desaturated when they become brighter?
- Rotation: Rotates the hue (e.g., does red in the highlights become more yellow or magenta?).
- Purity Boost: Tries to pump “purity” back into the colors after the curve.
Conclusion
AgX is minimally more complex than Sigmoid, but more powerful than Filmic. It is the best choice for images with extreme lighting situations (concerts, sunsets, artificial light), as it keeps colors stable where other modules fail.
Pro Tips for Experimenting:
- Playground: This module practically invites you to experiment – both with brightness/contrast and with colors. You can’t break anything!
- Effect too strong? Sometimes the AgX look seems a bit too flat or too extreme.
- Solution: You can reduce the overall strength of the module at any time. Click on the circle icon (blending) at the bottom of the module and reduce the Opacity to below 100%. This is a simple way to blend in the effect smoothly.